Installing the Salesforce Integration
Salesforce App Setup
This setup is required for SpotDraft’s Salesforce app to function.
The prerequisites
The prerequisites for Salesforce <> SpotDraft integration are:
- System administrator access in your Salesforce org with the rights to install an app from the AppExchange.
- Matching email address
Your login email on Salesforce must be the same as that on SpotDraft.
eg. If you use “john@company.com” to log in to your Salesforce account then the same email “john@company.com” should be added as a user on the SpotDraft account.
- Ensure the templates on SpotDraft are self-serve templates.
- Login to your SpotDraft workspace and navigate to ‘Workflow Manager’ under the ‘Manage’ section.
- If the required template’s questionnaire and template document is present on the Workflow Manager, it is a self-serve template.
To check whether the template that you want to configure with Salesforce is a self-serve template or not:
- Mapping sheet of variables
You need a list of mappings that you wish to configure. The data from Salesforce fields will be auto-populated in the SpotDraft template questionnaire based on these mappings.
A sample reference sheet can be found here: Salesforce Sample Mapping Sheet
- Salesforce integrations must be enabled for your workspace
You can check this by following the below steps:
- Login to your SpotDraft account.
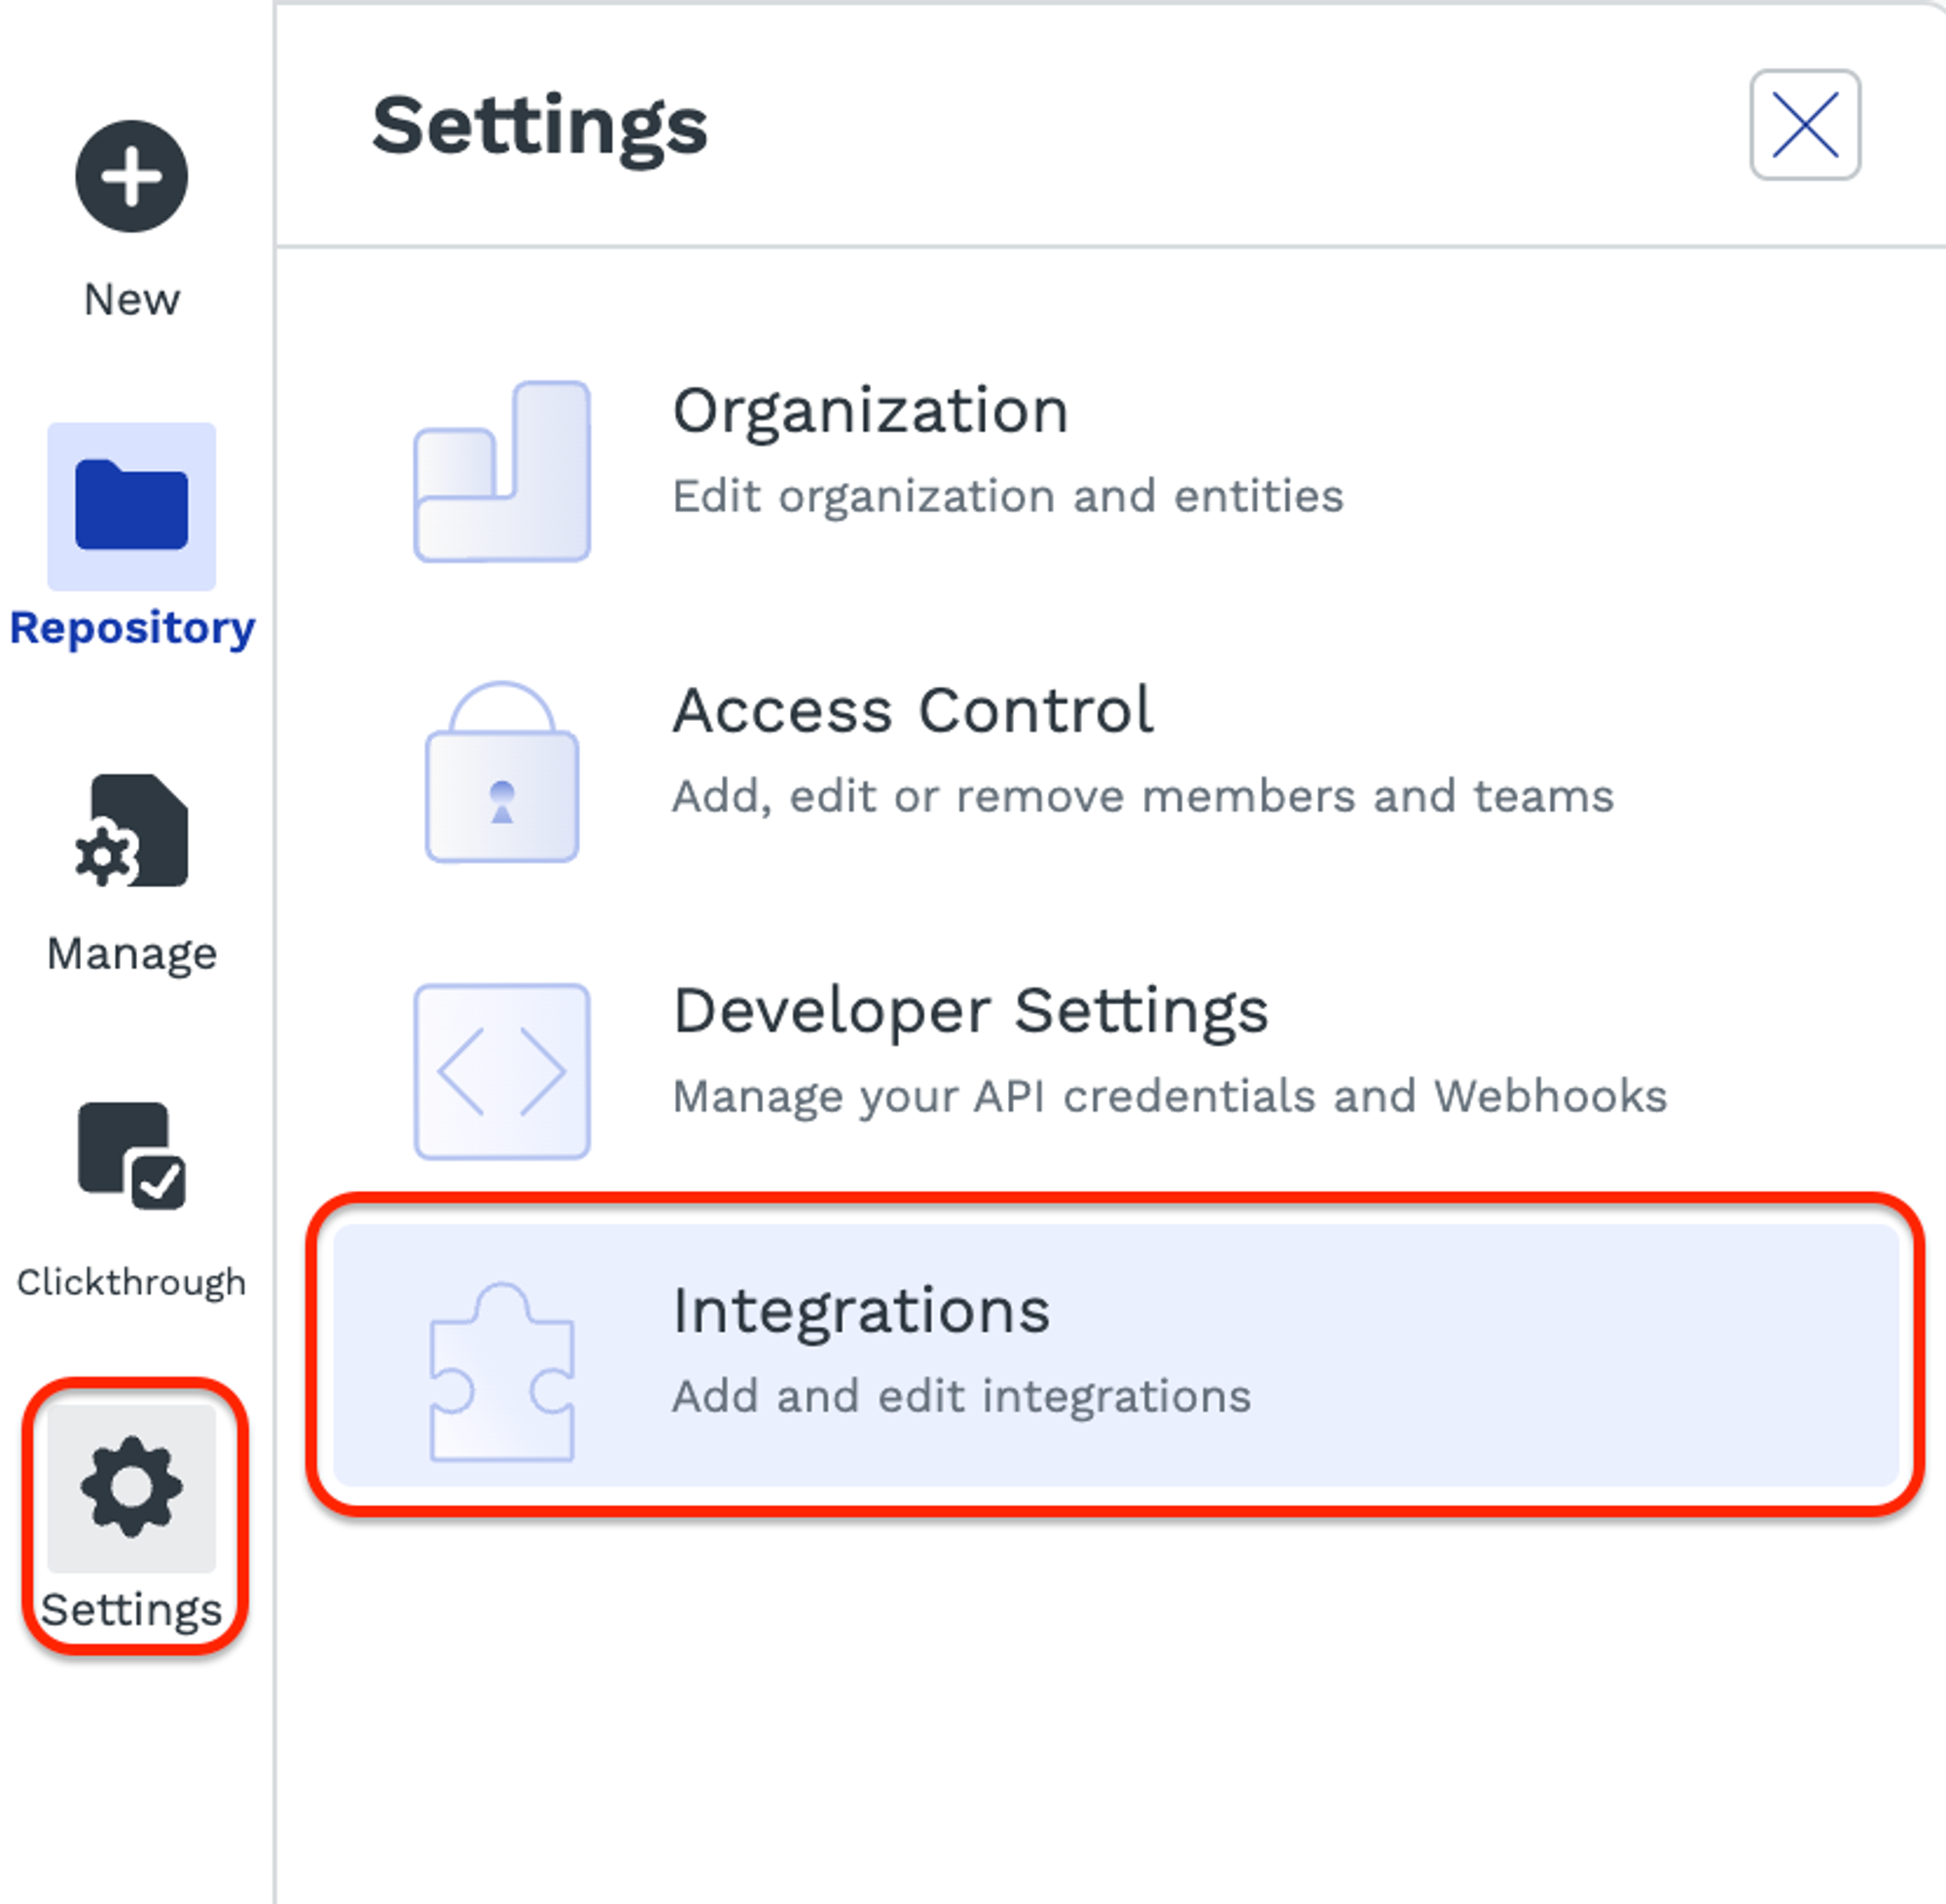
- Go to the settings page on your SpotDraft workspace.
- Open the “Integrations” card.
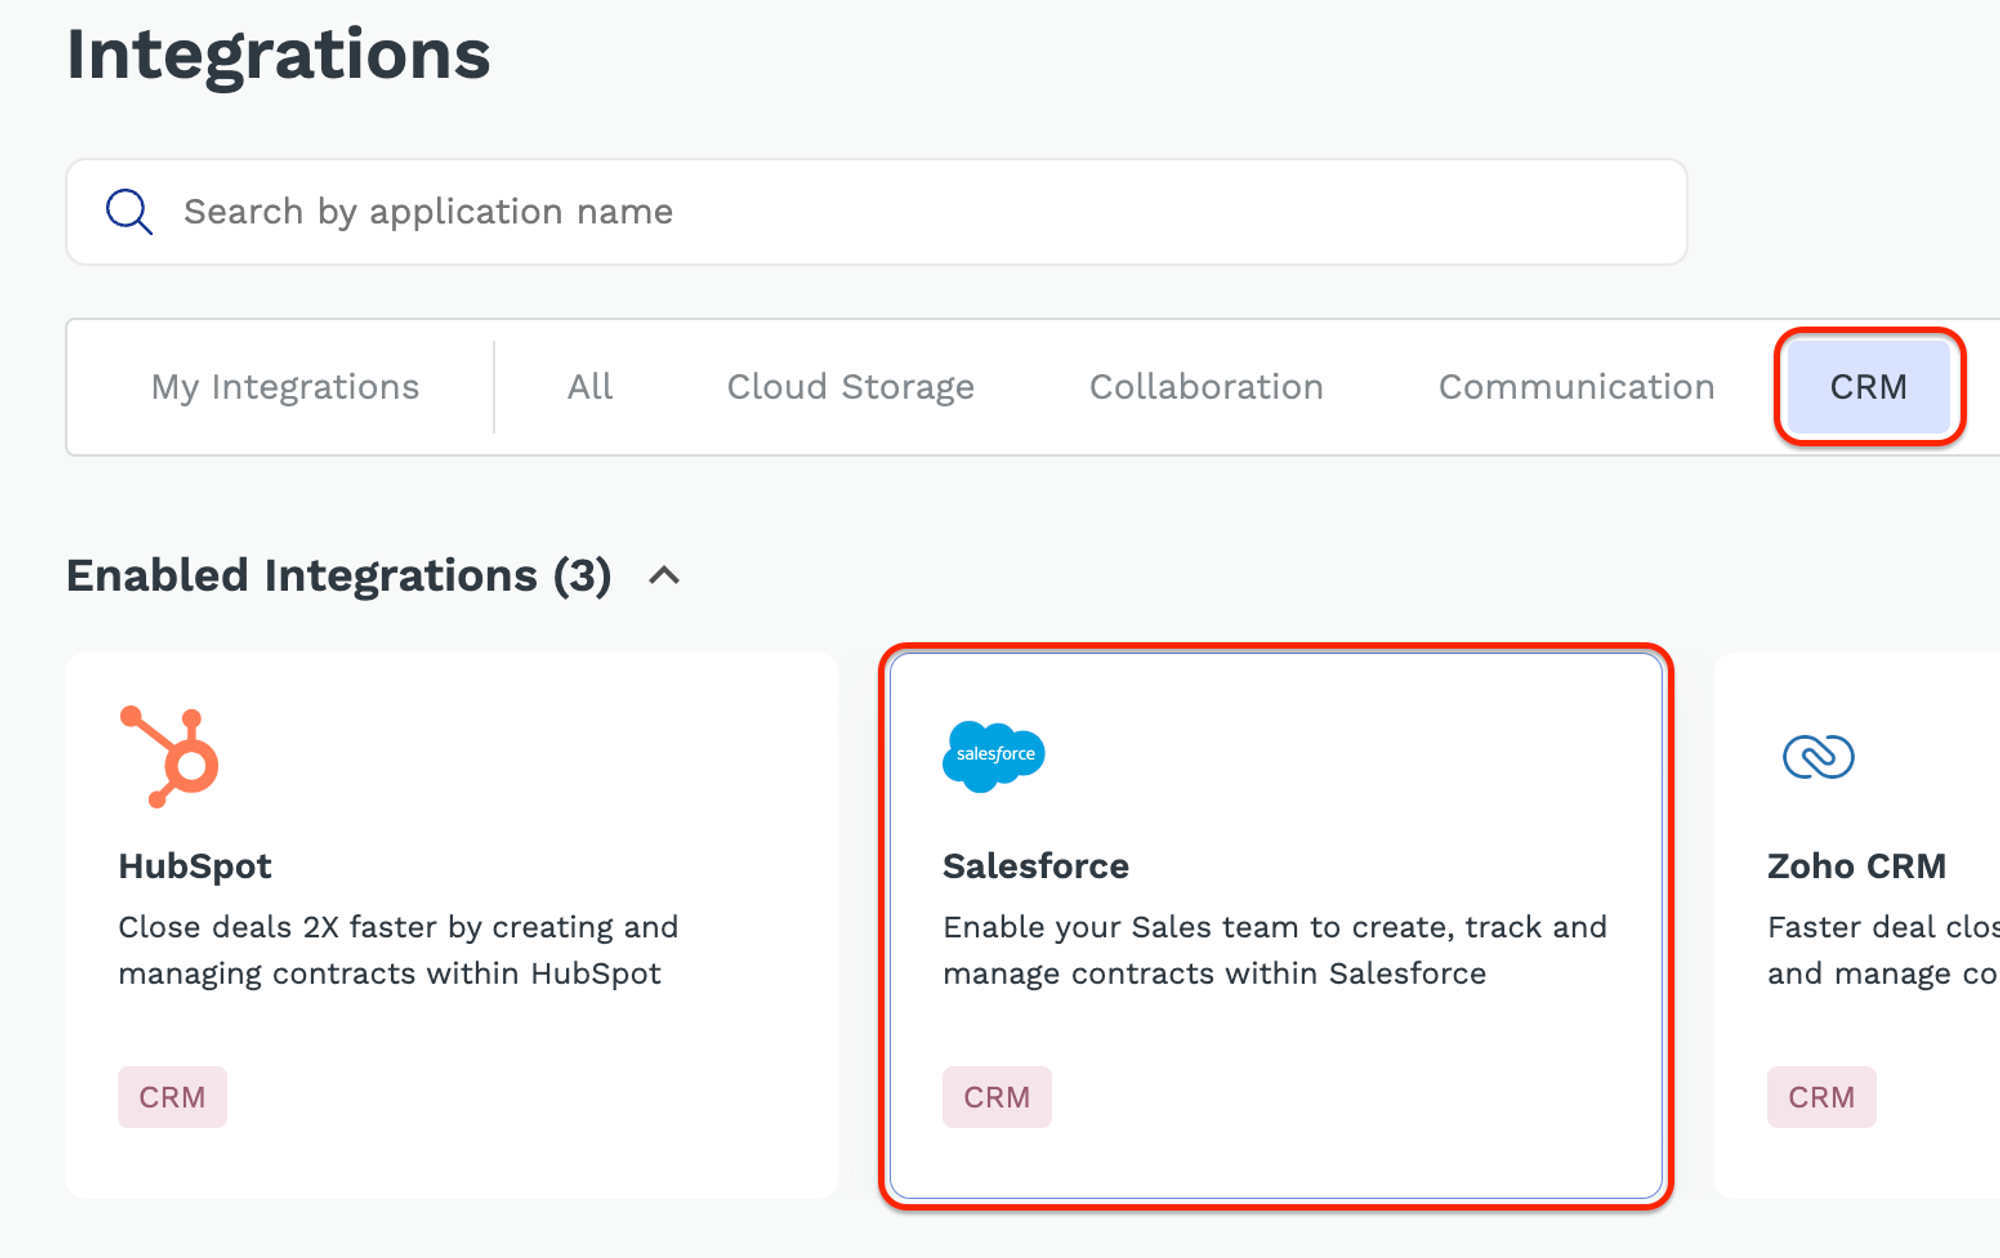
- Select the “CRM” tab.
- You will be able to see an integration card for “Salesforce”
Installation on Salesforce
- Installing the app from AppExchange and setting the right policies and permissions
- Placing the SpotDraft Lightning Web Component on supported objects
Installing the Generic Settings on SpotDraft
Along with some app-level configurations, both template contract workflow and upload workflow require certain common configurations. The generic settings are used for this.
Step 1: Navigating to the Salesforce Integration Settings
- Click on the ‘Settings’ icon on your SpotDraft navbar and select ‘Integrations’.
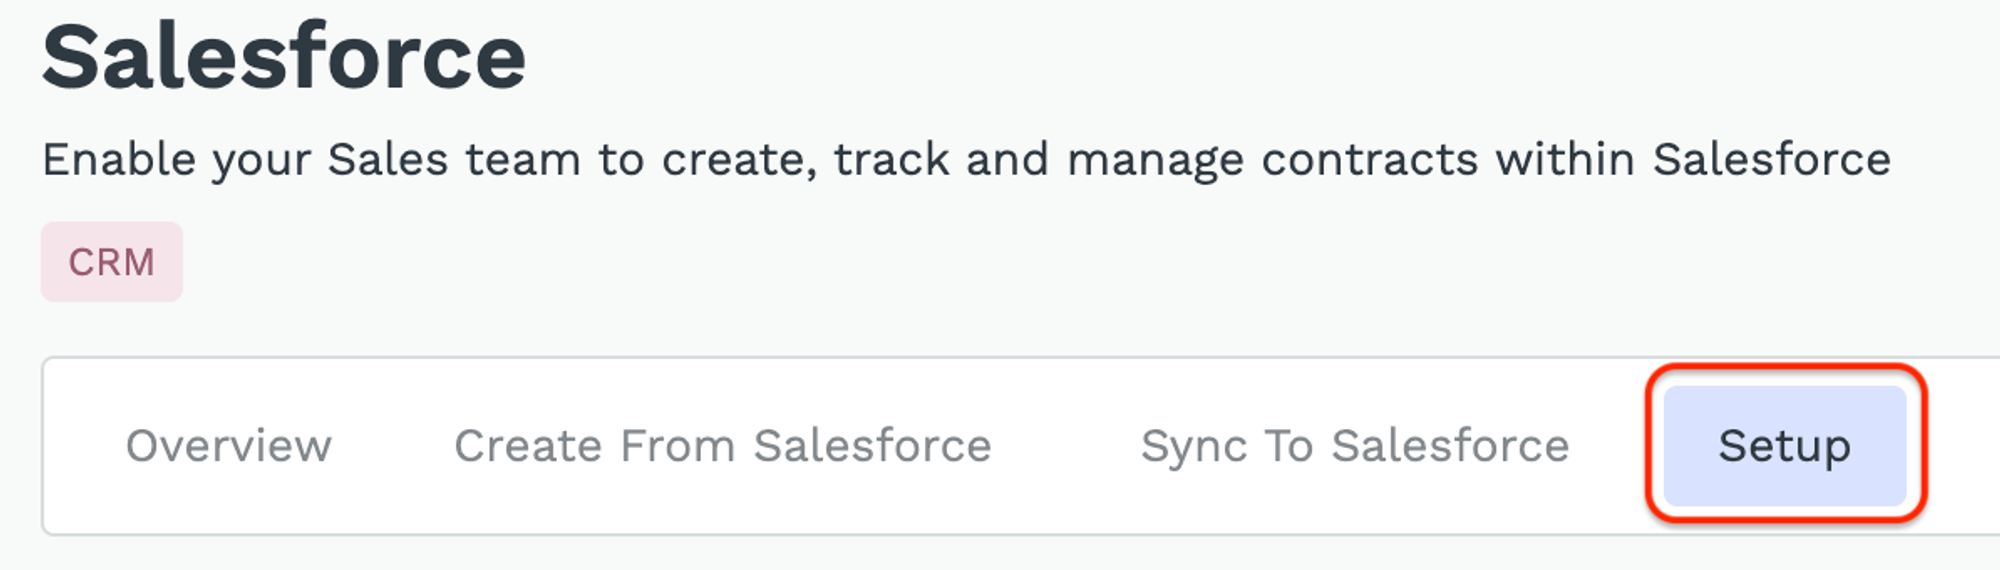
- Open the CRM section and select ‘Salesforce’
- Open the ‘Setup’ section for Salesforce
Step 2: Authenticating your Salesforce Account
- Click on ‘Connect’ for ‘Generic Settings’
- Click on ‘Next’

Step 3: Configuring ‘New Contract’ button accessibility:
For example, you can choose to lock the ‘New Contract’ button until the Opportunity reaches the ‘Contracting’ stage.
If you have complex logic, we recommend creating a new field on the Opportunity that takes up a formula based on the required condition.
You can then reference this field and the expected value (usually true/false based on the complex condition). The New Contract button is enabled or disabled using this.
- Click on ‘Next’ when done.

Step 4: Setting allowed workflows:
We currently support ‘Create from template’ and ‘Upload for review’ workflows. You can choose to show or hide these based on your requirements.
- Click on ‘Next’ when done.

Step 5: Filtering the templates:
You can choose to filter the template listing based on the value of a field.
- Enter the field to look for
- Pick a template and define the permissible field values to enable user visibility for the selected template.
- Click on ‘Next’.

Step 6: Mapping the counterparty details
- If the contract is being created from an Opportunity or an Account
- Select the field from which the Counterparty name has to be picked. This is usually the Account Name.
- Select the POC details such as first name, last name, and email (Opportunity → Owner ID)
- Click on ‘Next’

- If the contract is being created from a “Contract” object
- The POC details get picked up from the contacts under the account with is linked to the contract. (Contract → Account → Contact)
- There could be multiple contacts associated with the account therefore we have field Level used to identify the primary contact. Note: The POC will be picked where the value of the Level field is set as Primary.
- Click on ‘Next’

Step 7: Selecting fields for the snapshot:
You can select certain fields that give you a snapshot of the Opportunity, Account, or Contract from where the contract is being created. This is an optional step but will be useful for quick review while creating a contract.
- Click on ‘Next’ when done.

Step 8: Allowing duplicate contracts:
If there is a contract that’s awaiting signature, the integration restricts users from creating another contract of the same type to avoid duplicates.
- To enable creation of duplicate contracts, check the ‘Allow Duplicates’ box.
- Click on ‘Finish’.

Template Configuration Setup
Aimed at making contract creation faster and error-free, this integration automatically populates the required details from Salesforce into the contract, based on the mapping.
You can review this draft, make changes if needed, and generate a contract.
Currently, SpotDraft’s Salesforce app supports template contract creation only from the following Salesforce objects:
- Opportunity
- Account
- Contract
Step 1: Adding new integration
- Click on ‘Add Integration’ for ‘Create template contracts from Salesforce’ card.
Step 2: Authenticating Salesforce
If you already authenticated your Salesforce account while installing generic settings your Salesforce authentication details will be picked automatically.
The SpotDraft credentials will be auto-filled, and you do not have to make any changes here.
- Click on ‘Next’.

Step 3: Selecting the contract initiation Salesforce object
The Salesforce integration allows the creation of template contracts from the Opportunity, Account, and Contract objects.
- Select the object you want to create the contract from.
- Click on ‘Next’.

Step 4: Configuring template workflows
- Select the template that you wish to configure from the dropdown. The dropdown will contain all the available templates on your SpotDraft workspace.

- There are multiple actions you can take on the template contract. You can configure the order and visibility of these actions.

- It is possible to restrict the users from editing the contract questionnaire on the Salesforce app (Editing is enabled by default).
.png?table=block&id=63415ee7-281f-44d8-888d-d533a8ae9acb&cache=v2)

Step 5: Using Opportunity Product
- If your contract template requires the information picked from the Product object on Salesforce that’s linked to an Opportunity, check the ‘Use Product object’ box in this screen and provide the API name of your Opportunity Product object.
- Click on ‘Next’.

Step 6: Mapping Opportunity Product items
- In this screen, you can map the fields from your Opportunity product object to the fields of SpotDraft contract questions.
- Click on ‘Next’ when done.

Step 7: Using Quote and Quote Lines
- If your contract template requires the information picked from the Quote and Quote Lines objects of Salesforce, check the ‘Map Quote and Quote Line fields’ box.

Enter the API names for the Quote and Quote Lines objects. Default Salesforce object names are pre-filled.
- Quote - Enter the Salesforce API name for the Quote object.
- Quote Line - Enter the Salesforce API name for the Quote Line object.
- Quote-Opportunity Link - Enter the Salesforce API name for the related Opportunity field which is present in the Quote object.
- Quote Primary Field - Multiple quotes can be associated with an opportunity but the data can be picked only from a single quote. By default, an opportunity will always contain only one primary quote. Enter the API name of the Primary field here.
- Quote Line-Quote Link - Each quote line will be associated with a quote. Enter the Salesforce API name for the related Quote field added to the Quote Line object.
- Quote Line Number - Salesforce APIs give the quote lines in random order as opposed to what the user sees on Salesforce. If you want to sort them in the required order, create a column called Number for the quote line object. Then, enter the API name for the number field of the Quote Lines object.

Step 8: Mapping Quote Line fields
- In this screen, you can map the fields from your Quote Lines object to the SpotDraft contract questions.
- Click on ‘Next’.

Step 9: Mapping data from Opportunity, Quote, and Account objects
This screen contains the configuration for mapping the fields from the Opportunity, Account, and Contract object fields listed on the left-hand side.
All the Salesforce object fields are listed on the left. All the SpotDraft template fields are listed on the right.
- Map the respective Salesforce and SpotDraft fields and click on ‘Next’.

Step 10: Mapping lookup fields from the Opportunity object
- In case you want to map data from any lookup fields associated with an Opportunity, add the API name of the lookup on the left side and select the relevant SpotDraft template field in the dropdown on the right.
- Click on ‘Next’ when done.

Step 11: Configuring Template Format Options
A template can be sent in multiple formats to the counterparty from Salesforce - as a contract link, docx or PDF.
- Select the formats that you want to make available on Salesforce.
- Press ‘Next’ when done.

Step 12: Mapping duration fields
Certain fields on Salesforce contain duration values. Fields like subscription term, contract period, etc. All such duration fields can be defined in this configuration screen. The Salesforce record might only capture the number, but not the unit.
- Set the default unit for duration fields here.
- Click on ‘Next’.

Step 13: Mapping currency fields
Similar to duration fields, certain fields on Salesforce contain currency/amount data, for eg. fields like annual contract value, deal amount, etc.
- Define the currency fields as required in this configuration screen.
- Click on ‘Next’.

Step 14: Adding a solution name and description screen:
The name and description here are used to give a brief about the installed solution. If you have more than 1 template configured, it will be easier to identify it by name if you need to update it down the line.
- Give the integration a name that you can use for quick identification.
- Click on ‘Finish’ and ‘Connect’.

Sync Details to Custom SpotDraft Objects on Salesforce
To use the native reporting functionality of Salesforce, SpotDraft has created custom Salesforce objects to store relevant contract information. You can configure it by following the below steps.
Installation steps
Step 1: Starting off
- Navigate to Settings → Integrations → CRM → Salesforce.
- Open the ‘Sync To Salesforce' section.
- Click on 'Connect' for the 'Push contract information from SpotDraft to Salesforce' item.

Step 2: Entering the SpotDraft Contract and SpotDraft Signatory object API names
This is pre-populated by default, but you have the option to override this to send the information to your own custom objects.
- Click on ‘Next’

Step 2: Mapping the SpotDraft Contract object fields:
This is required to capture the relevant details.
- Map the required fields and click on ‘Next’.

Step 3: Mapping the SpotDraft Signatory object fields:
- Map the required signatory objects and for SpotDraft (on the left) with Salesforce (on the right).
- Click on ‘Finish’ and ‘Connect’.

Sync Key Pointer details to Salesforce Fields
(Opportunity, Account, and Contract)
This integration supports syncing real-time Key Pointer data with Salesforce objects - Account, Opportunity, and Contract.
For eg, If a contract is initiated from the Account object in Salesforce, the integration automatically syncs Key Pointer values exclusively with fields linked to the Account object.
The same principle applies to contracts initiated from the Opportunity or Contract objects, with mapped Salesforce record fields ensuring seamless alignment and data consistency. This process streamlines connections between the contract and specific fields of the relevant Salesforce object.
The prerequisites
- To map Key Pointers from SpotDraft to Salesforce fields, the data type of the Salesforce Supported Object fields should match the data type of the Key Pointer fields in SpotDraft.
- The Key Pointers must be associated with a Contract Type on SpotDraft.
- Ensure that the Integration “Update Key Pointer from SpotDraft to SalesForce” is enabled in your SpotDraft workspace under section Settings → Integrations → CRM → Salesforce
Installation steps
Step 1:
Login to SpotDraft and navigate to Settings → Integrations → CRM → Salesforce.
Click on Salesforce Integration Card

Step 2:
Click on "Sync To Salesforce”.
Navigate to "Key Pointers sync to Salesforce" and Click on the Add Integration button.
.png?table=block&id=3d8689b3-fa0b-4585-aa22-34290374c7cd&cache=v2)
Step 3:
Authenticate your SpotDraft and Salesforce account and Click "Next" in the Authentication Page.

Step 4:
Select a Record/ Object Type from the list, for Quote Record Type ensure to add the Quote API Name and Click ‘Next’.

Step 5:
Select a ‘Contract type’ from the list and click ‘Next’.
.png?table=block&id=d70e990b-0486-4126-ba25-b7c537dd0c78&cache=v2)
Step 6:
Map Key Pointer fields on SpotDraft for a particular contract type with Salesforce Record fields and click on ‘Next’.

Step 7:
Provide the Solution a name and click on ‘Finish’.

Step 8:
Go to Settings → Integrations → CRM → Salesforce and click on Connect to enable the Integration.
Verify your installation
Once the integration has been successfully installed you can verify it by executing a dummy contract (of the same Contract Type as the integration setup) on your workspace.
The Key Pointer values will get pushed to mapped Salesforce Record fields if the integration has been correctly configured.
Push to Salesforce FAQs
Q. I have successfully installed the 'Update Key Pointer from SpotDraft to SalesForce' integration but I can’t find the Key Pointer details getting updated on Salesforce.
A. The following actions can help resolve this issue:
- Check if the authentication was properly set up during the installation process.
- Check if the mapped Record fields are present in Salesforce.
- Since the Integration works on the Contract type level, ensure that you are expecting the push of Key Pointer details from the same contract type as the integration setup.
Q. Which Salesforce Objects are currently supported by this Integration?
A. You can only push Key Pointer details to mapped Salesforce Account, Opportunity and Contract fields using this integration.
Q. Will the Salesforce Record field get updated at any point in the lifecycle of the contract when the Key Pointers get updated?
A. Yes, the mapped Record fields will get updated every time the Key Pointers are updated for a real-time sync.
Q. Can I update Key Pointer data from Opportunity through this Integration
A. No, this integration only supports one way information flow, i.e. from SpotDraft to Salesforce.
Key Pointer details from SpotDraft can be pushed to the mapped supported object fields on Salesforce.
Last updated on November 30, 2023