Jira - Creating Contracts on SpotDraft
Last updated: January 29, 2026
🛠️ Installing the Jira Integration
Create SpotDraft contracts using Jira tickets within minutes
🚀 Introduction
Revolutionize your sales journey with the innovative SpotDraft-Jira integration, designed specifically for sales professionals like you who are navigating the complexities of deal management in Jira and the separate world of contract creation in SpotDraft. This integration bridges the gap, bringing an unprecedented level of simplicity and coherence to your sales process.
Why You’ll Love the SpotDraft-Jira Integration:
- Seamless Sales to Contract Transition: Say goodbye to the hassle of switching between Jira and SpotDraft. Our integration automates the flow of information, so when you're ready to move from negotiating a deal in Jira to drafting a contract, it happens smoothly in the background.
- Automated Contract Creation: Trigger the generation of contracts directly within your Jira workflow. Whether you're marking a deal as 'won' or creating a new opportunity, SpotDraft jumps into action, pulling the necessary information to start drafting the contract.
- Tailored to Your Sales Flow: We understand every sales process is unique. That's why this integration is designed to be flexible, aligning perfectly with your custom sales stages and activities in Jira.
- Direct Feedback in Jira: Once your contract is drafted in SpotDraft, a link to the document is automatically posted back in your Jira issue. This keeps everything connected and easily accessible, right where you need it.
- Executed Contracts, Now in Jira: With the latest update, the executed contract is automatically pushed back as an attachment in Jira. Sales users can now access the final signed copy directly within their Jira issues, eliminating the need to switch between tools.
- Focus on Closing, Not Admin: By eliminating the manual effort of entering contract details, you can concentrate on what you do best – closing deals and building relationships.
The SpotDraft-Jira integration is more than just a tool; it’s your partner in streamlining sales operations, ensuring that you stay focused on your deals without getting bogged down by contract management details
📝 Prerequisites
Guidance for Business Users and Jira Administrators: This section ensures you have all the prerequisites in place for a smooth integration journey.
Checklist for Jira Integration Setup:
- SpotDraft Account with permission: To add Integrations
- Jira Account with System Administrator Role: The individual will need permission to add fields and create automation in Jira.
- Jira Automation Knowledge: Familiarity with Jira’s automation functionality, as it is essential for setting up the automation that triggers contract creation in SpotDraft.
- Verify Jira Activation in SpotDraft: To ensure the Jira integration is enabled, log into your SpotDraft account and go to 'Settings' → 'Integrations' → 'Ticketing'. Check if the ‘Jira’ card is present, indicating the integration is active.
-
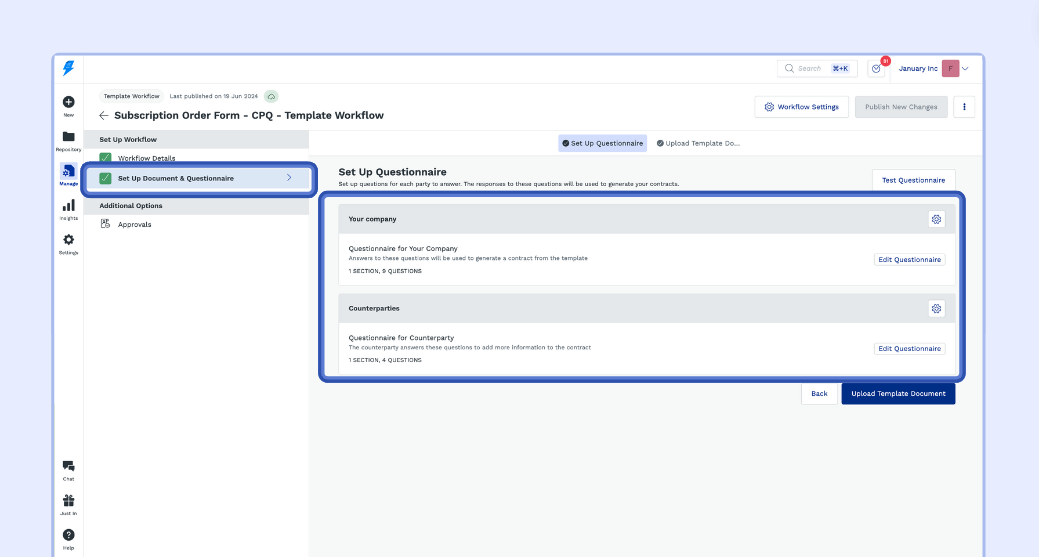
Self-Serve Templates: Confirm that your desired templates are self-serve:
- Go to 'Manage' → 'Workflow Manager'.
- Click the desired ‘Workflow Title’.
- Click ‘Setup Document & Questionnaire’.
- If you can see this section the templates are self-serve.
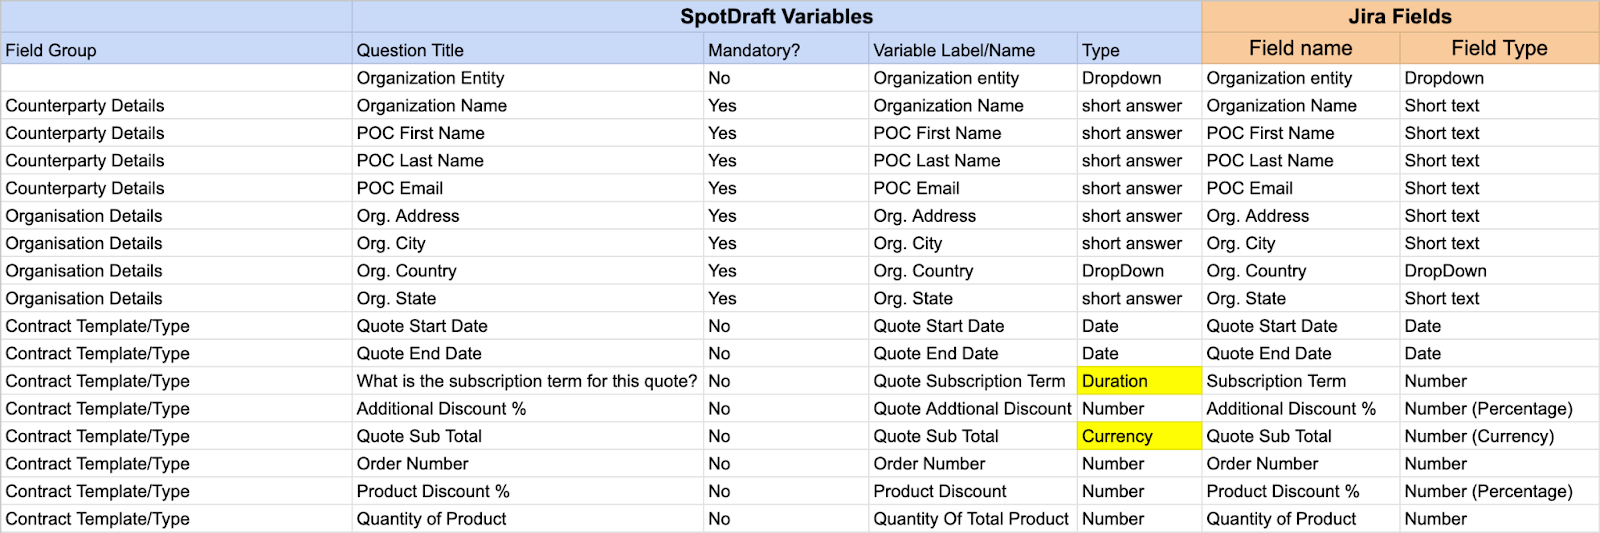
- Mapping Sheet: A mapping sheet is essential for automating the flow of data between Jira and SpotDraft:
- Select Contract Templates: Determine which SpotDraft contract template requires integration with Jira (e.g., CPQ, NDA).
- Request Mapping Sheet: For the selected template, ask your SpotDraft representative for a corresponding mapping sheet.
- Map Jira Fields: On the provided mapping sheet, enter the matching Jira fields next to the SpotDraft fields. Create custom Jira fields if necessary.
- Review with SpotDraft: Collaborate with your SpotDraft representative to confirm the accuracy of the mapping sheets.
-
Keep Mapping Sheets Accessible: Retain the completed mapping sheets for reference during the integration setup.
Note. Repeat this process for each SpotDraft contract template you plan to integrate with Jira.
Example completed mapping sheet
⚙️ Installation & Configuration
Insights for System Administrators: While this section is detailed for the technical setup, we encourage business users to engage in the process for insights into how their systems and processes integrate.
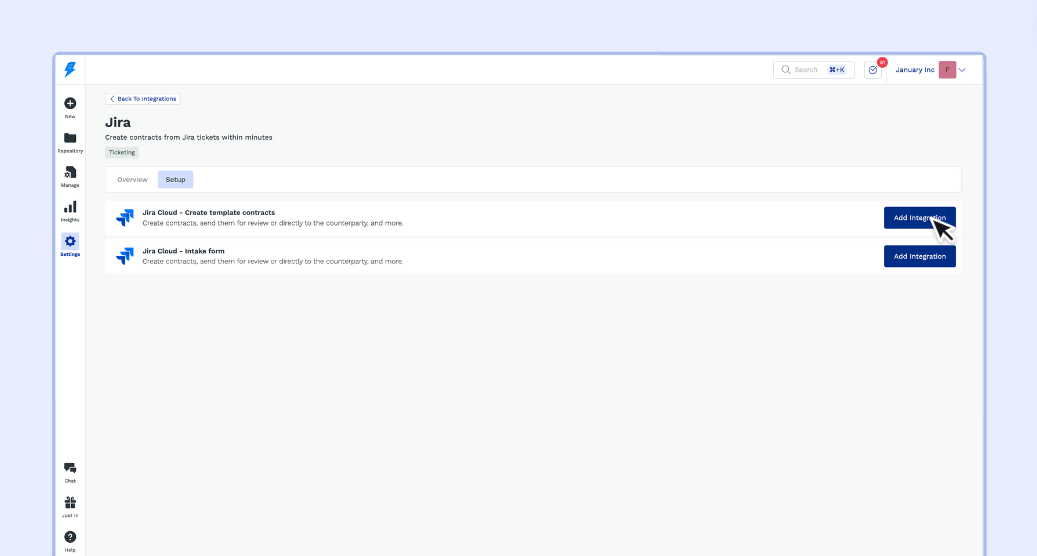
1 - Login to your SpotDraft workspace and navigate to Settings → Integrations.
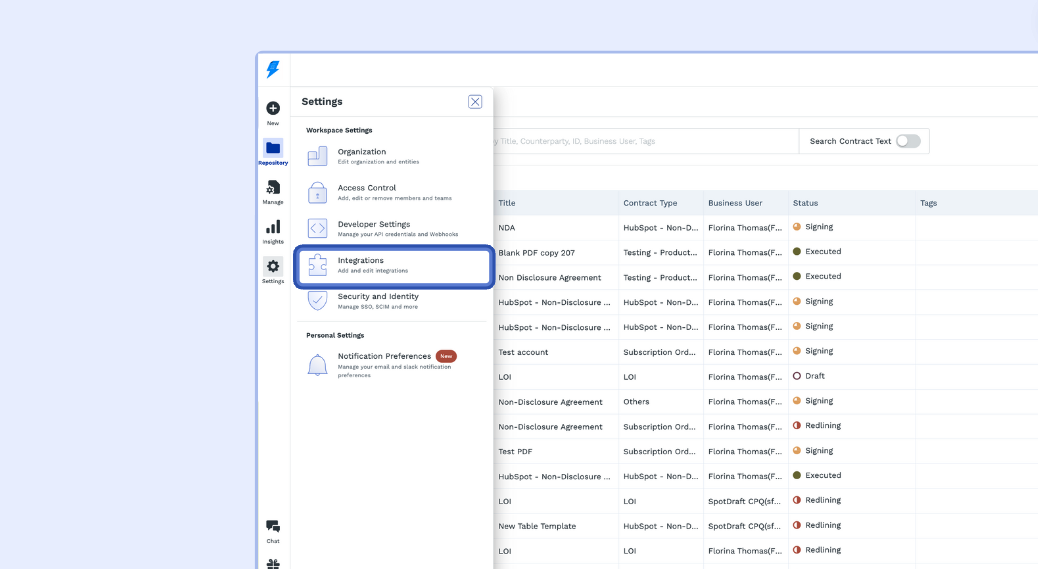
2 - Open the ‘Ticketing’ section and select Jira.
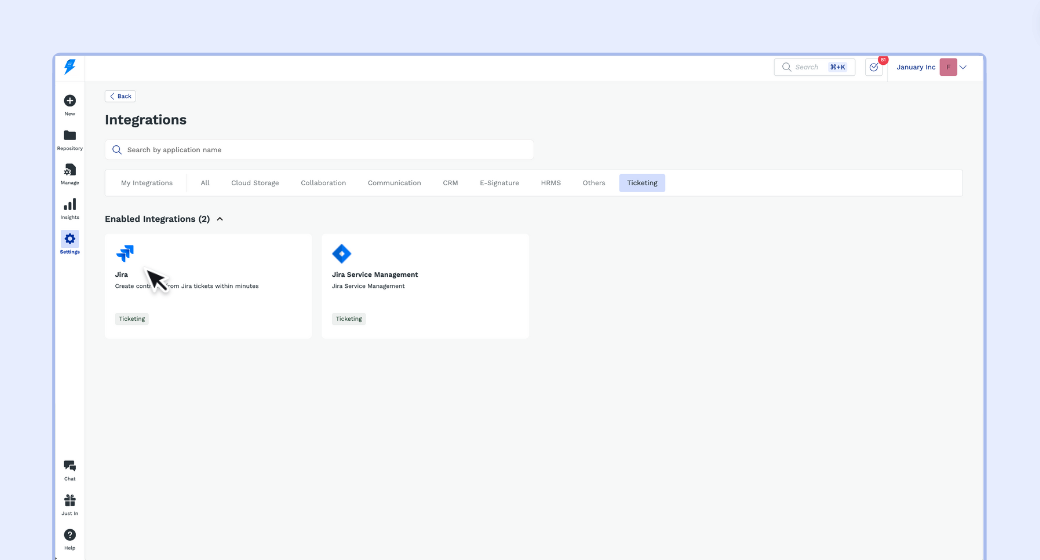
3 - Open the Setup section and click Add Integration.
Configuring the Jira integration for Contract Template Workflows
SpotDraft Configuration for Contract Template Workflows
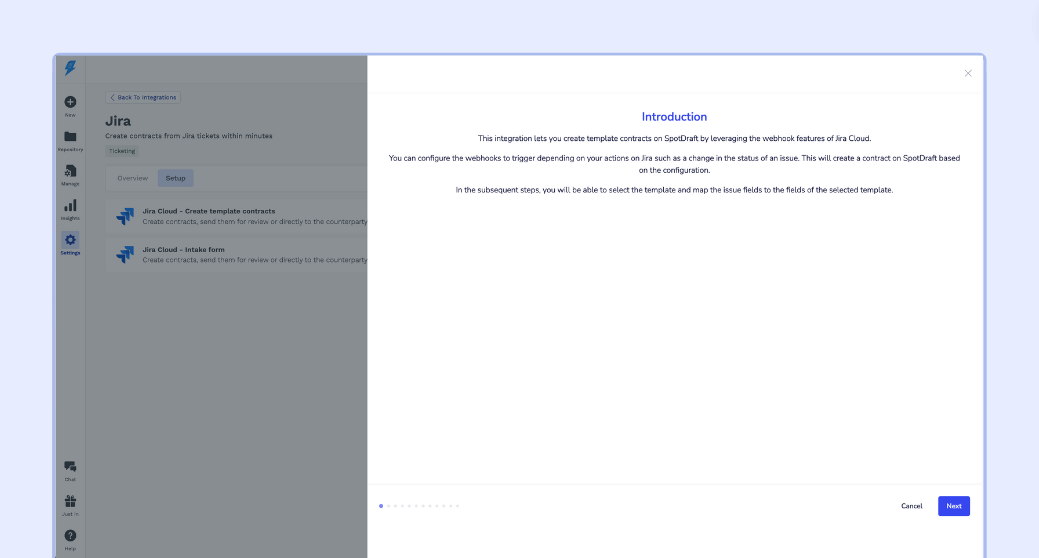
Follow the Setup wizard to:
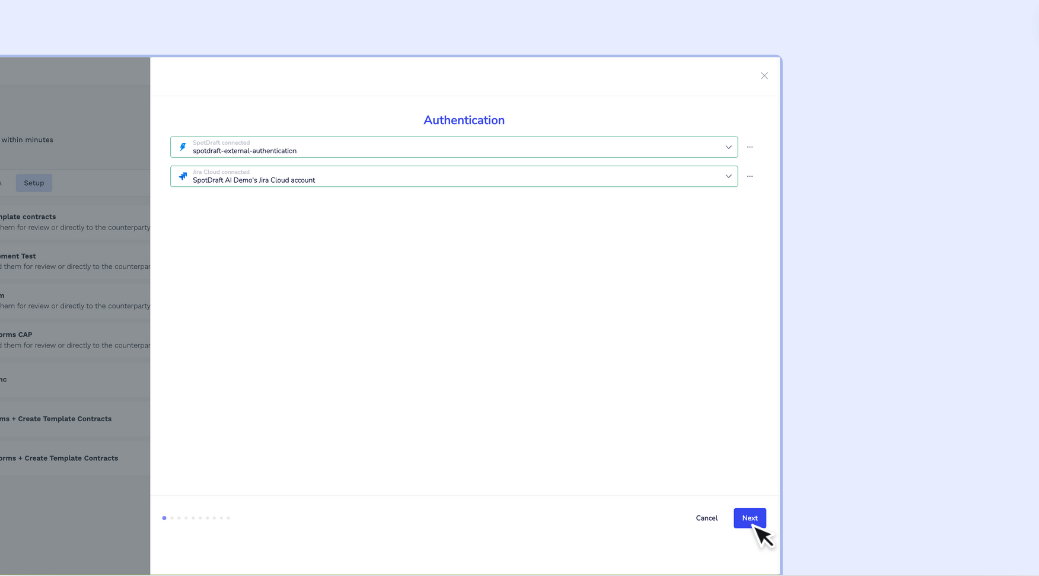
1. Authenticate your Jira account.
1.1 - Click Next.
1.2 - Click New authentication.
Note. It is a good idea to be logged into Jira in the same browser.
1.3 - Enter your Jira site’s base URL.
Note. the base url is up to the .net I.e. If your url is https://spotdraft.atlassian.net/jira/core/projects/TSI/board, the following is the base URL https://spotdraft.atlassian.net
1.4 - Click Create.

1.5 - Select the Atlassian site where the Board is to integrate with SpotDraft.
1.6 - Click Accept.
Note. Tray.io is used by SpotDraft for this integration.
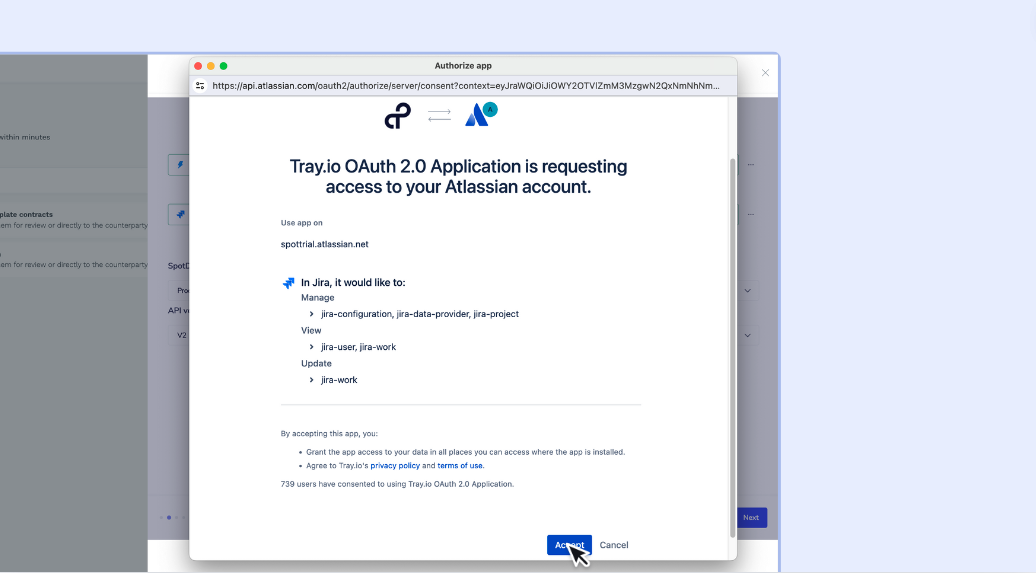
Note. A ‘success message’ will appear on SpotDraft confirming authentication between SpotDraft & Jira is complete.

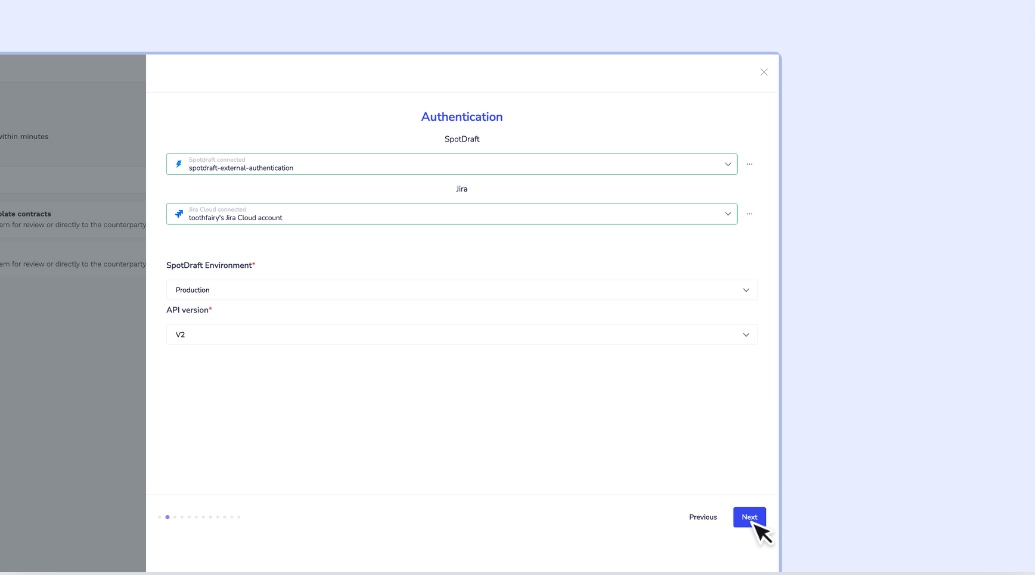
1.7 - Change the API version to the most recent.
1.8 - Click Next.
Note. if you prefer to install on Sandbox and or use a different API version, amend this before hitting ‘Next’.
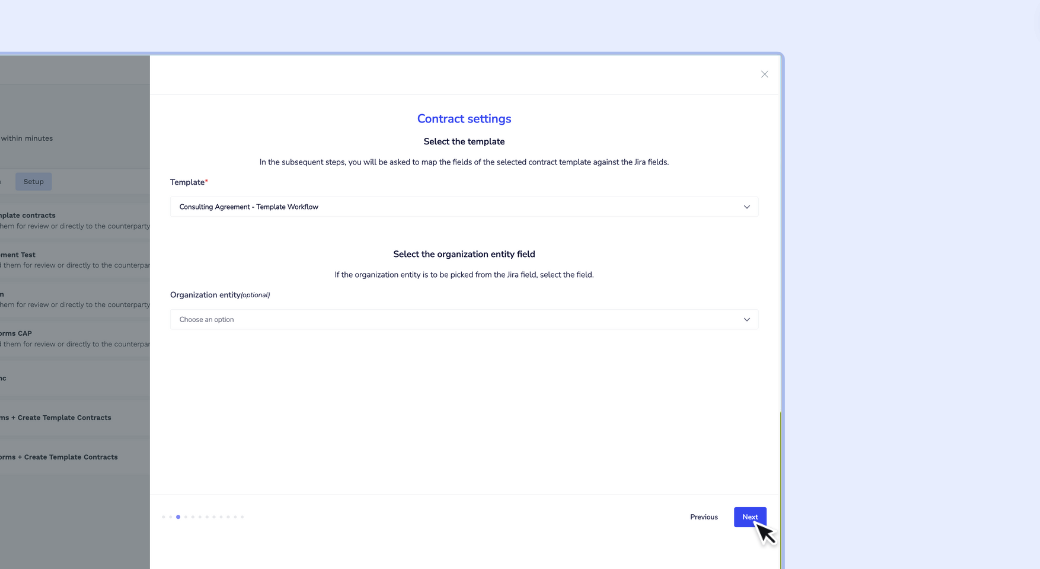
2. Contract Settings
2.1 - Select the Contract Template that relates to the mapping sheet completed in the prerequisites e.g. CPQ.
💡 Tip: If the mapping sheet was created some time ago, it’s a good idea to review it and ensure it’s still accurate.
2.2 - If your mapping sheet includes ‘Entity’, select the Jira field mapped to Entity.
2.3 - Click Next’.
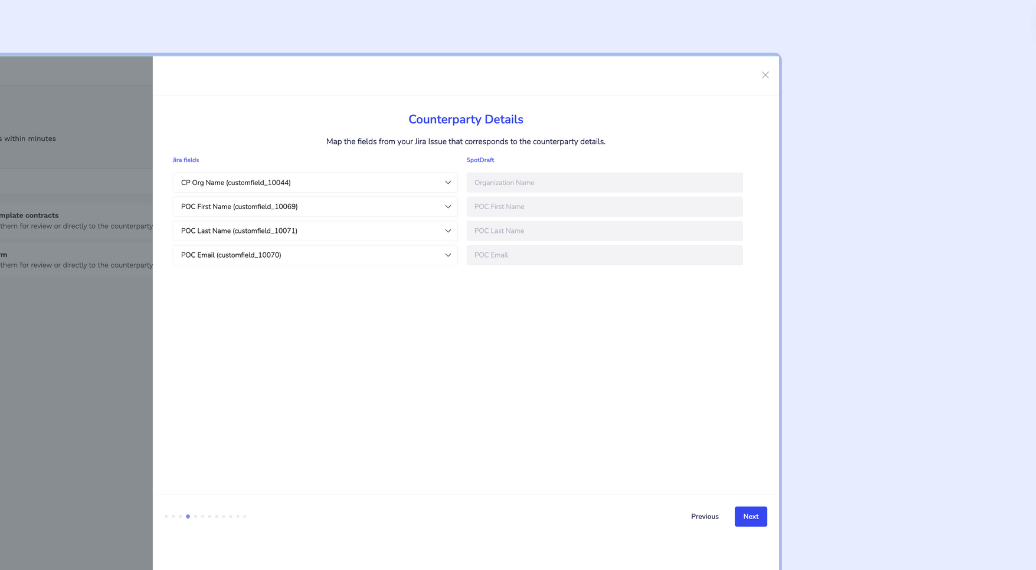
3. Counterparty Details
3.1 - With your mapping sheet at hand, locate the fields whose SpotDraft ‘Field Group’ is ‘Counterparty Details‘.
3.2 - Select the Jira field that maps to the corresponding SpotDraft field for each one.
3.3 - Click Next.
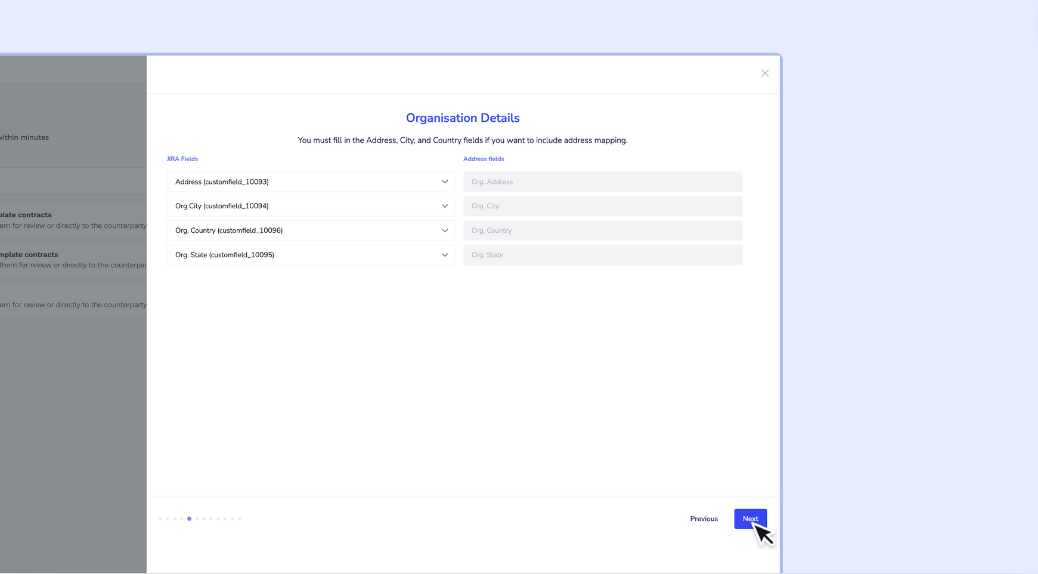
4. Organisation Details
4.1 - With your mapping sheet at hand, locate the fields whose SpotDraft ‘Field Group’ is ‘Organization Details‘.
4.2 - Select the Jira field that maps to the corresponding SpotDraft field for each one.
4.3 - Click Next.
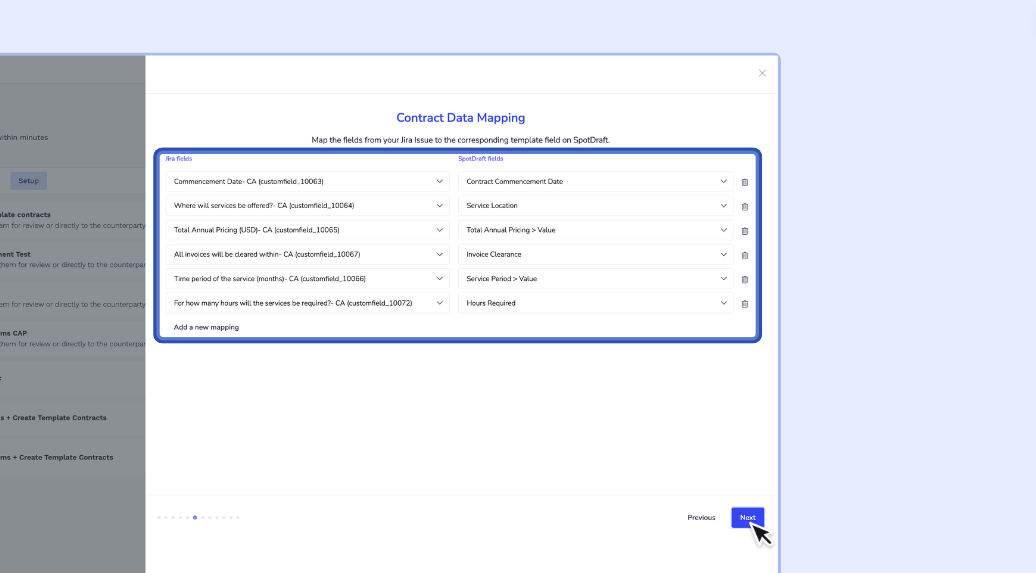
5. Contract Data Mapping
There are 3 pages of the wizard to map the contract data and set units for duration field types and currency for amount fields.
The mapping sheet will detail all of the Contract Template’s questions and have them mapped to Jira fields.
5.1 - With your mapping sheet at hand, locate the fields whose SpotDraft ‘Field Group’ is ‘Contract Template/Type‘.
5.2 - Click Add a new mapping such that all ‘SpotDraft Fields’ (right column) have a mapping row.
Note. Questions that were given the Type ‘Duration’ or ‘Currency’ will have multiple fields available, only create a mapping row for the ones that have the suffix ‘ > Value’.
5.3 - Select the corresponding Jira field for each mapping row based on the mapping sheet.
5.4 - Click Next.
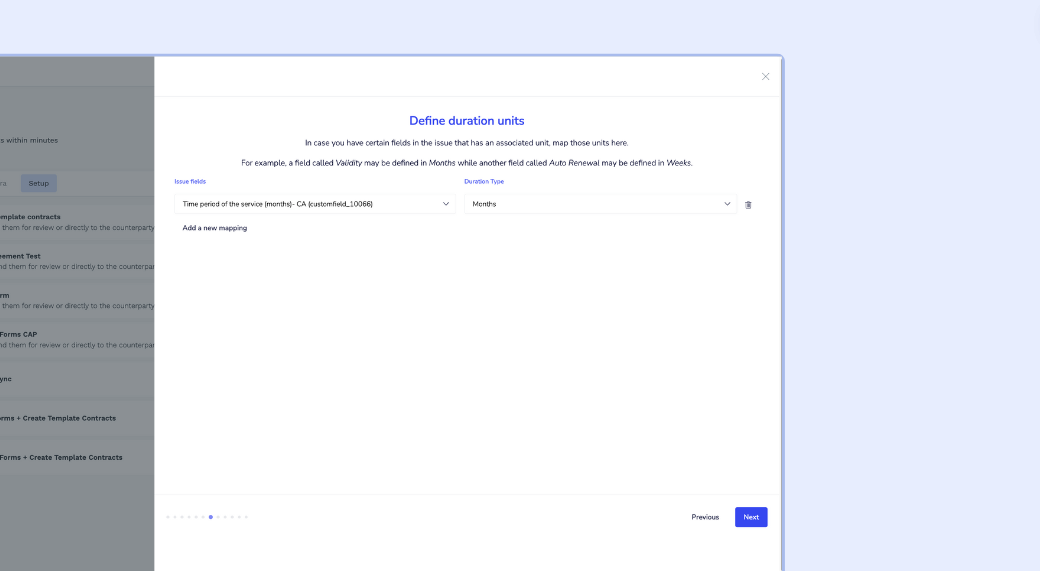
6. Define duration Units
For any contract template questions that have the SpotDraft Data Type set to ‘Duration’ in the mapping sheet, we need to define the duration’s unit e.g. Days, Weeks, etc.
6.1 - Check your mapping sheet for the SpotDraft questions whose Type is ‘Duration’ (these were highlighted when the mapping sheet was created).
6.2 - If there are none, click Next
6.3 - If there are some, click Add a new mapping such that all ‘Duration’ field types have a mapping row.
6.4 - Set the duration unit for each mapping row.
6.5 - Click Next.
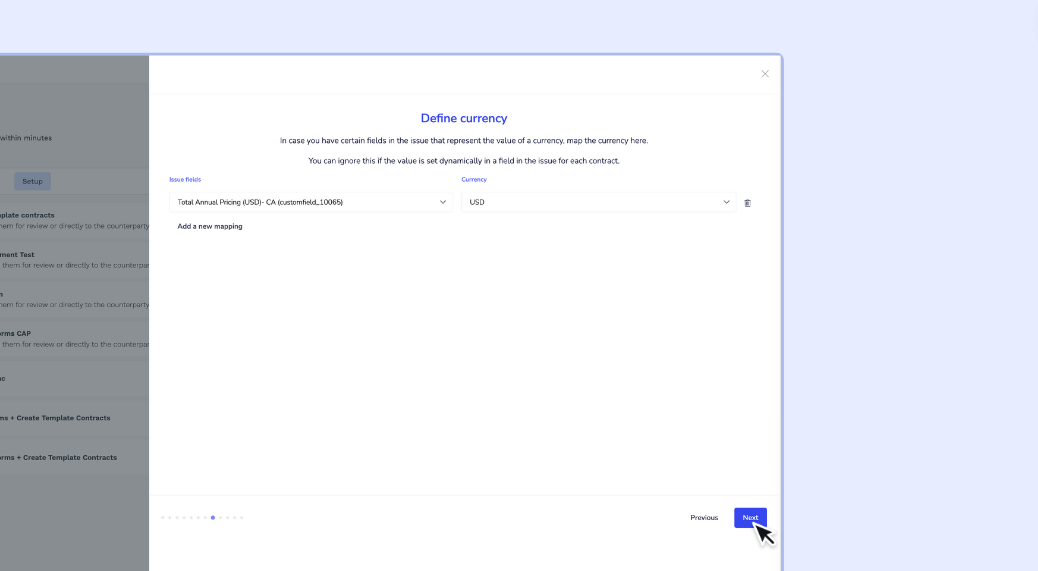
7. Map Currency fields.
For any Contract Template questions that have the SpotDraft Data Type set to ‘Currency’ in the mapping sheet, we need to define which currency e.g. USD, GBP etc.
7.1 - If there are no currency type fields, simply click Next
7.2 - Check your mapping sheet for the SpotDraft questions whose Type is ‘Currency’ (these were highlighted when the mapping sheet was created).
7.3 - Click Add a new mapping such that all ‘Currency’ field types have a mapping row.
7.4 - Set the ‘Currency’ for each mapping row e.g. Pound Sterling.
7.5 - Click Next.
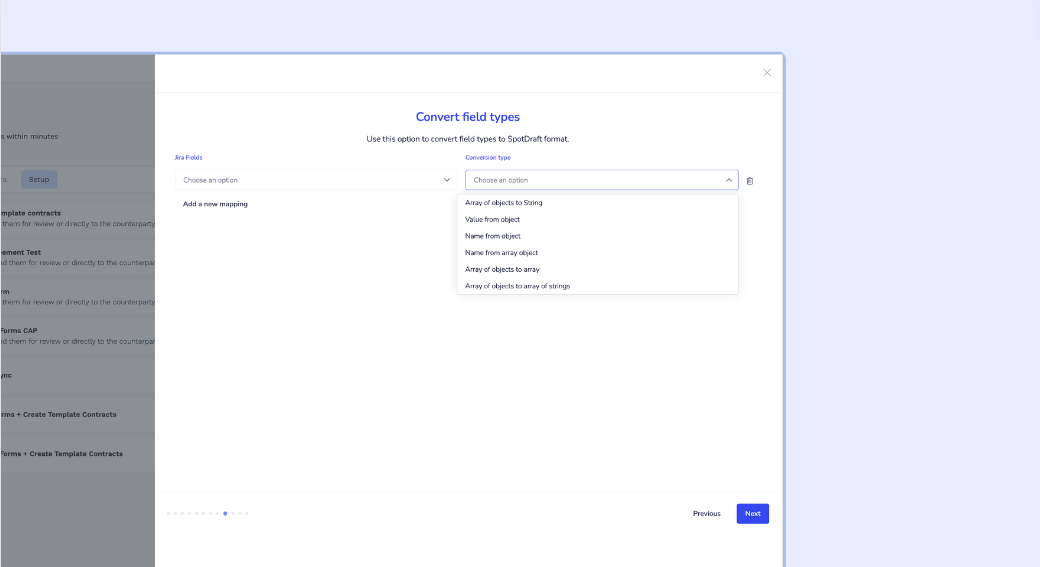
7. Convert field types
Step 1 - If any of the mapped JIRA fields are of a dropdown type or the payload is a nested object, select the JIRA field on the left and "Value from Object" on the right.
Step 2 - If any of the mapped JIRA fields are of a multi-dropdown type or the payload is an array of nested objects. Select the JIRA field on the left and "Array of Objects to string" on the right
Step 3 - Click ‘Next’.
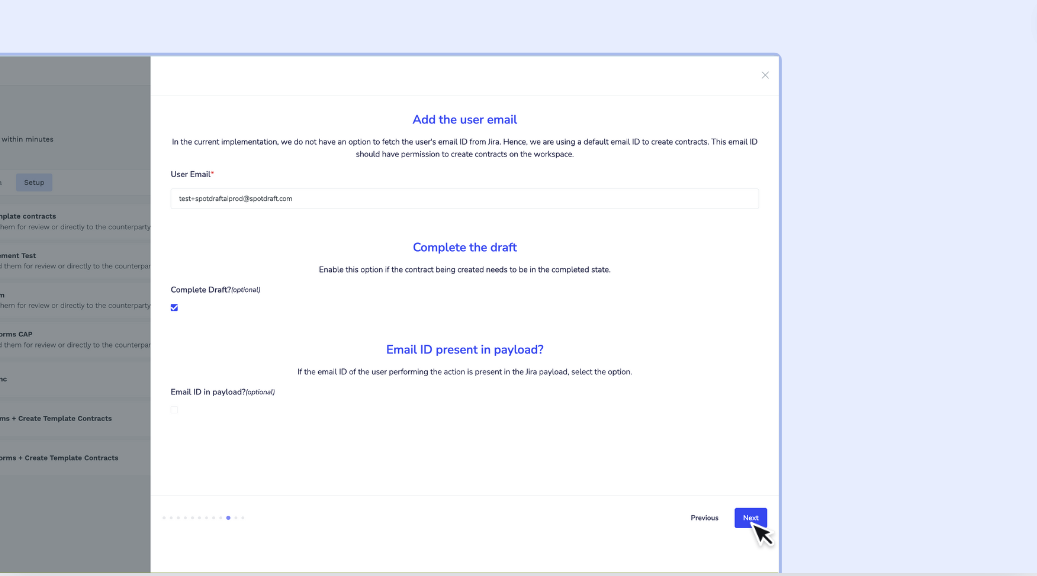
8. Add the user email
8.1 - Enter the email address to be used in SpotDraft as the creator of the contract.
8.2 - Enable the Complete Draft checkbox if the contract being created needs to be a complete draft.
8.3 - Click Next.
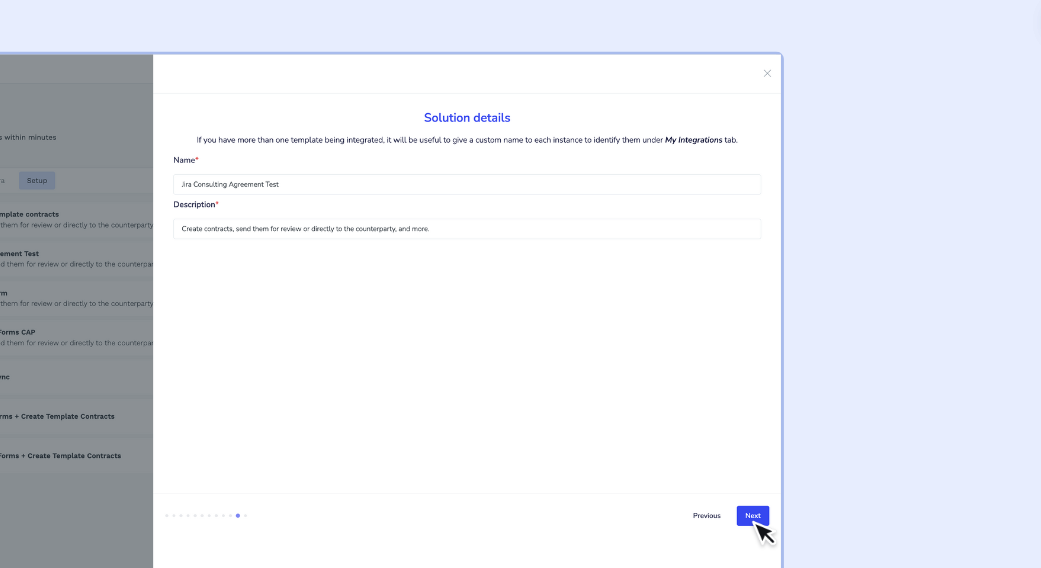
9. Solution details.
9.1 - Enter the ‘Name’ and ‘Description’.
9.2 - Click Next
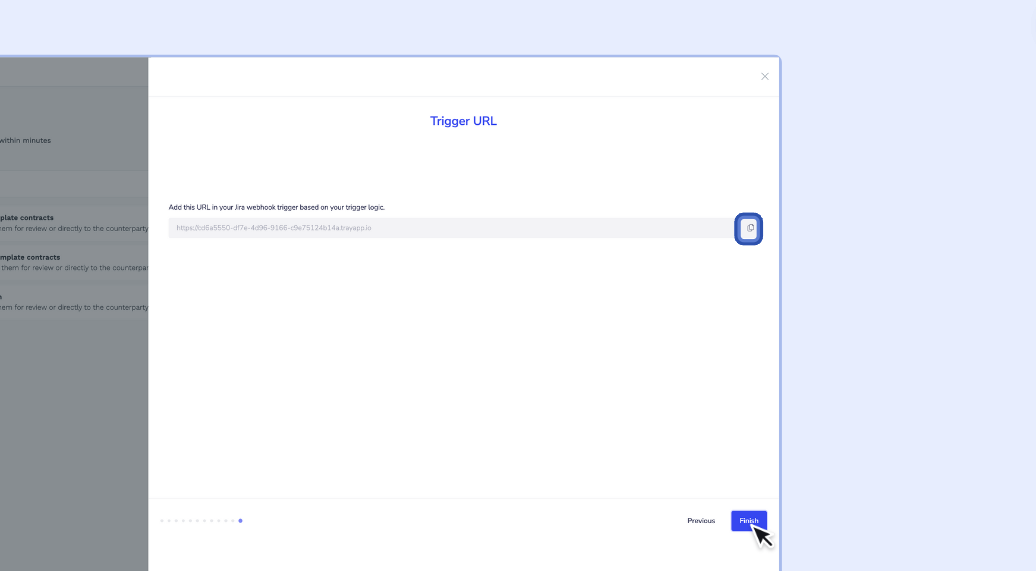
10. Trigger URL
This last step provides you with the webhook URL needed to set up the automation in Jira.
10.1 - Copy and paste the Contract Template webhook URL to a document as you will need it when configuring the automation in Jira.
10.2 - Click Finish.
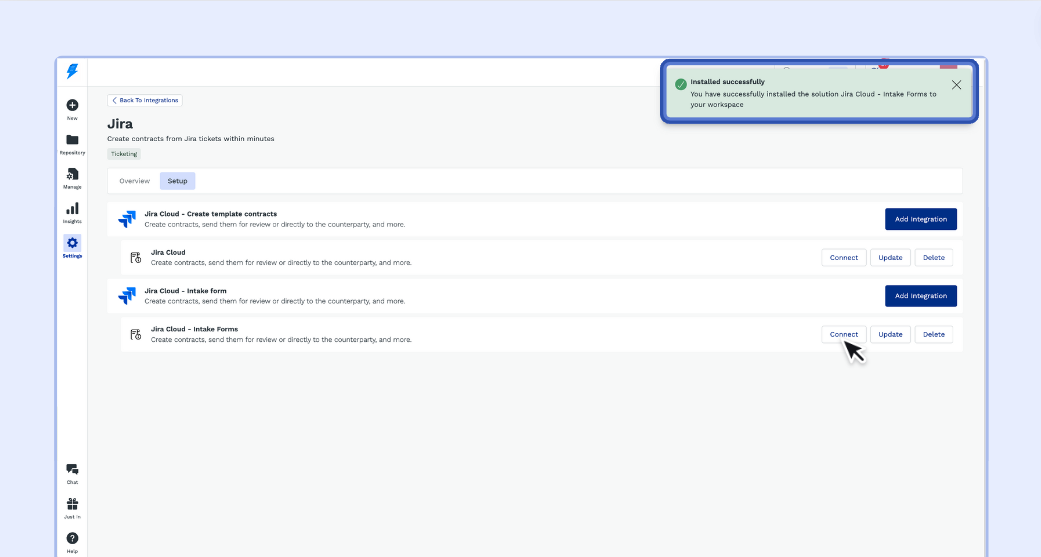
11. After finalizing the wizard by clicking Finish, you will be directed back to the Integration Setup page. A confirmation message stating 'Installed Successfully' will appear.
11.1 - To complete the process, simply click the Connect button.
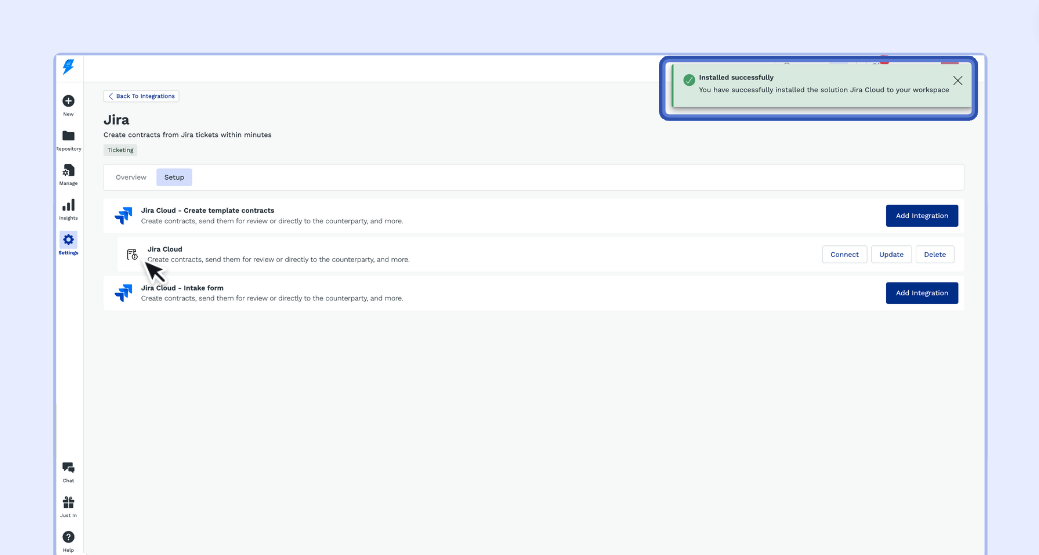
Note. It’s now time to add the webhook to Jira.
Jira Configuration for Contract Template Workflows
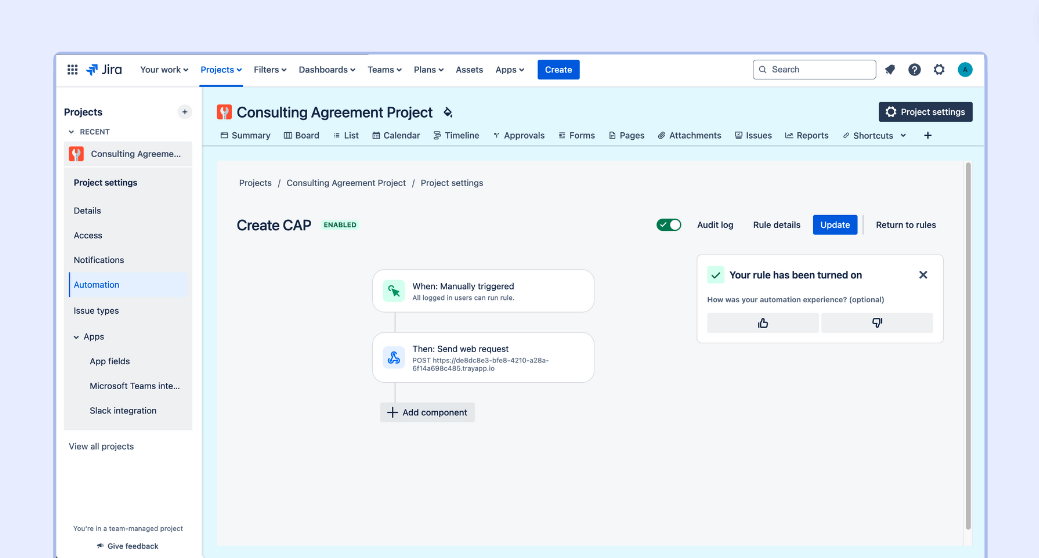
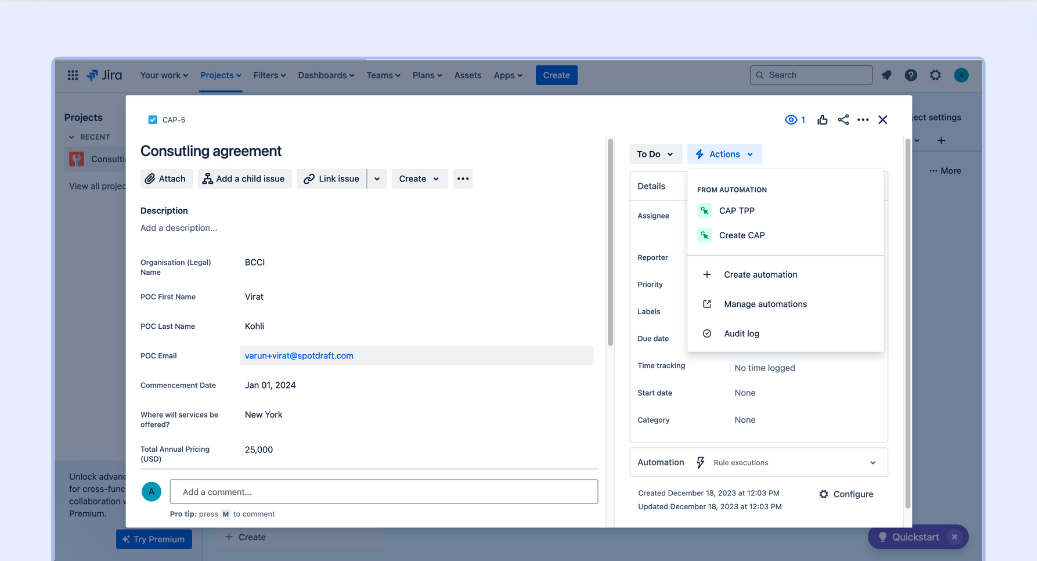
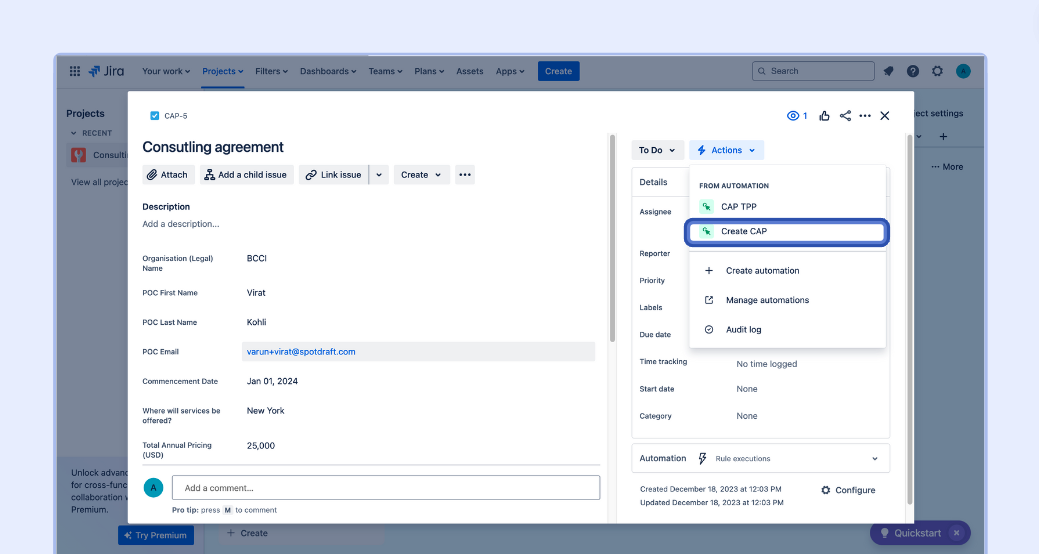
In this example, when the user Manually triggers via button trigger, the Contract should be created in SpotDraft pulling in all the data from Jira.
1 - Log into Jira and navigate to the board that you wish to Integrate with SpotDraft.
2 - Navigate to Project settings > Automation.
3 - Click Create rule.
4. Create the rule that should trigger when to create the Contract Template in SpotDraft.
Note. In this example, we want to create the contract when the user performs a manual trigger.
4.1 - Enter Manual trigger from issue in ‘Seach triggers’ box.
4.2 - Provide a name to the trigger and Click Next.
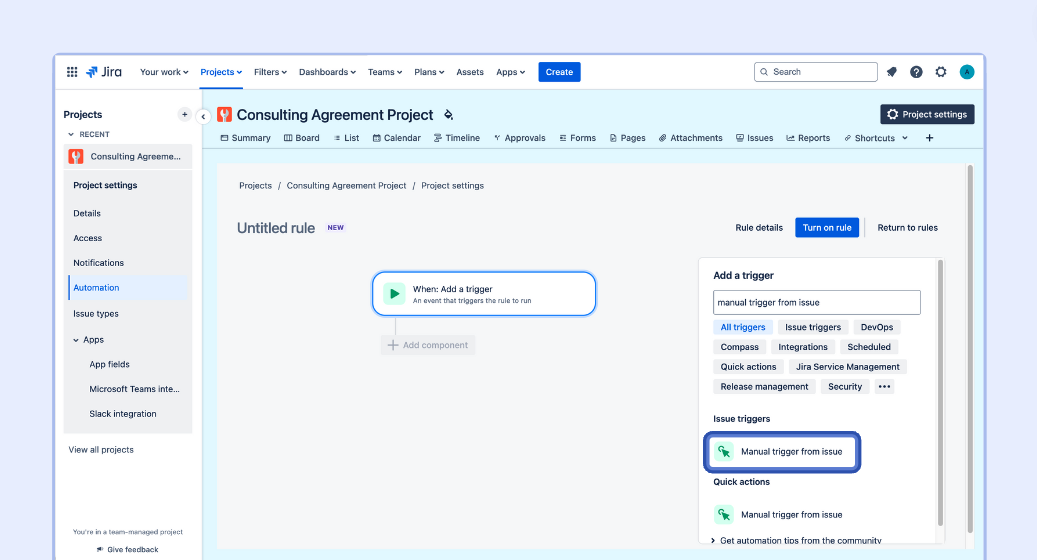
4.3 - Select the component THEN Add Action.
4.4 - Enter Send web request into the ‘Seach triggers’ box.
4.5 - Click on the Send web request trigger.
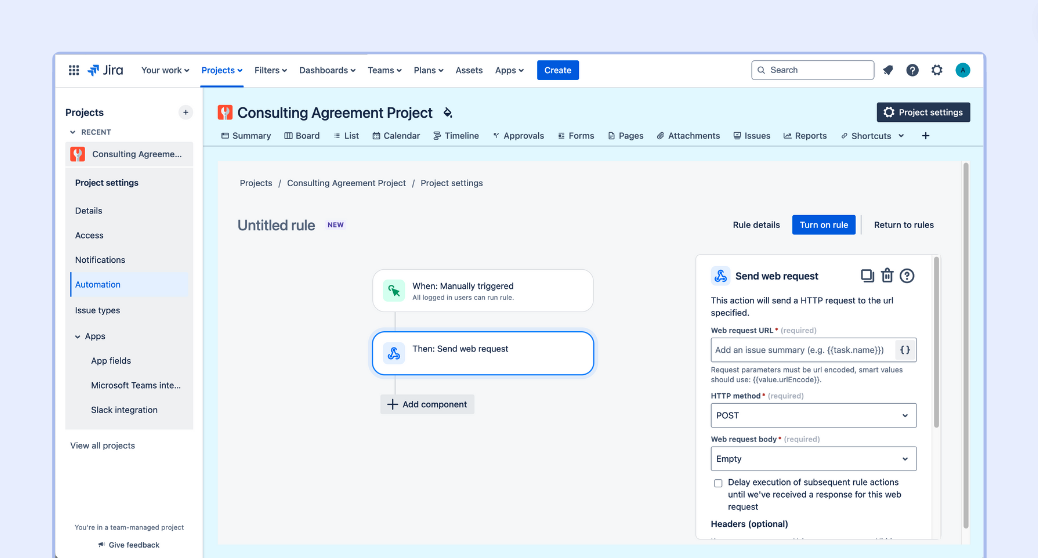
4.6 - Paste the SpotDraft Contract Template webhook URL (saved previously) into the ‘Web request URL’ field.
4.7 - Select Issue data (Jira format) from the ‘Webrequest body’ field.
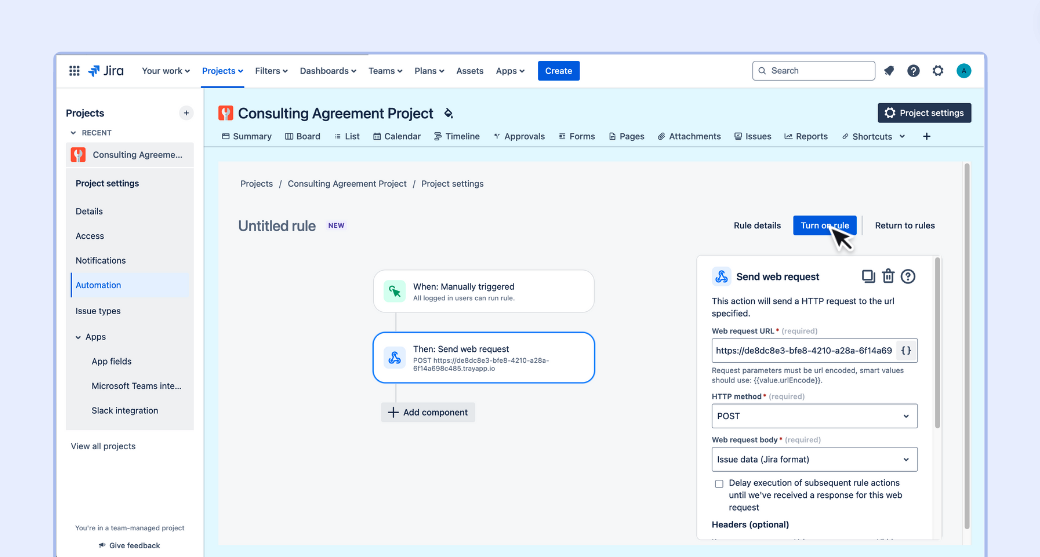
4.8 - Populate the ‘Rule name’ field e.g. Create SpotDraft Contract’.
4.9 - Click Turn on rule.
Note. Jira will confirm the rule has been ‘enabled’.
Configuring the Jira integration for Contract Intake Forms
SpotDraft Configuration for Contract Intake Forms
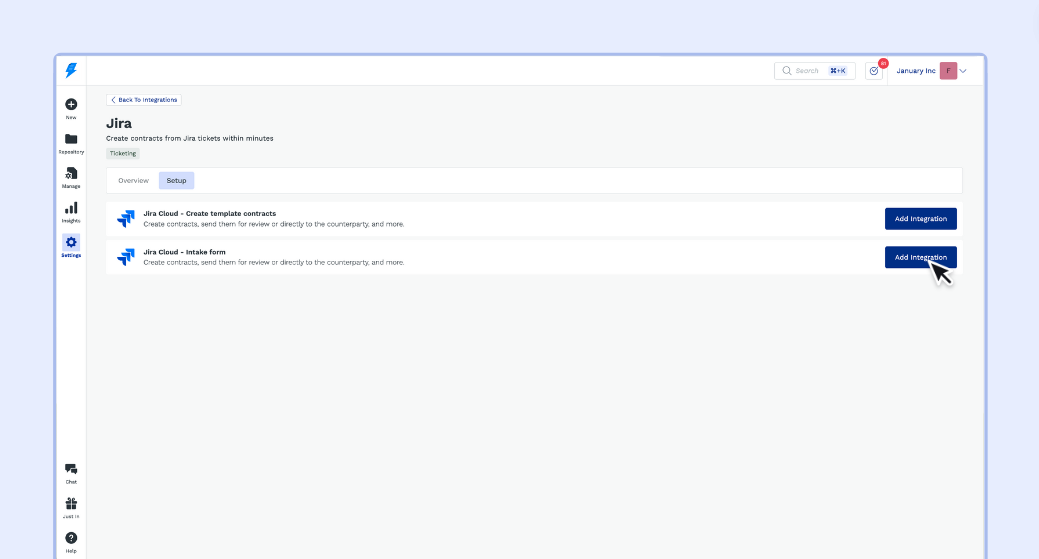
1 - Log into SpotDraft, navigate to Settings → Integrations → Ticketing, open the Jira card and select Setup from the top menu, then Click the Add Integration button on the Jira Cloud - Intake form option to open the setup wizard.
Follow the Setup wizard to:
2. Authenticate your Jira account.
2.1 - You can simply click Next on the Authenticate your Jira account as that was done when configuring the Contract Template Integration.
3. Contract Configuration
3.1 - Select the Contract Type that relates to the mapping sheet completed in the prerequisites e.g. CPQ.
💡 Tip: If the mapping sheet was created some time ago, it’s a good idea to review it and ensure it’s still accurate.
3.2 - Select the Jira field that maps to the SpotDraft Counterparty Organization Name
3.3 - If the mapping sheet includes ‘Entity’, select the Jira field mapped to Entity.
3.4 - Click Next.
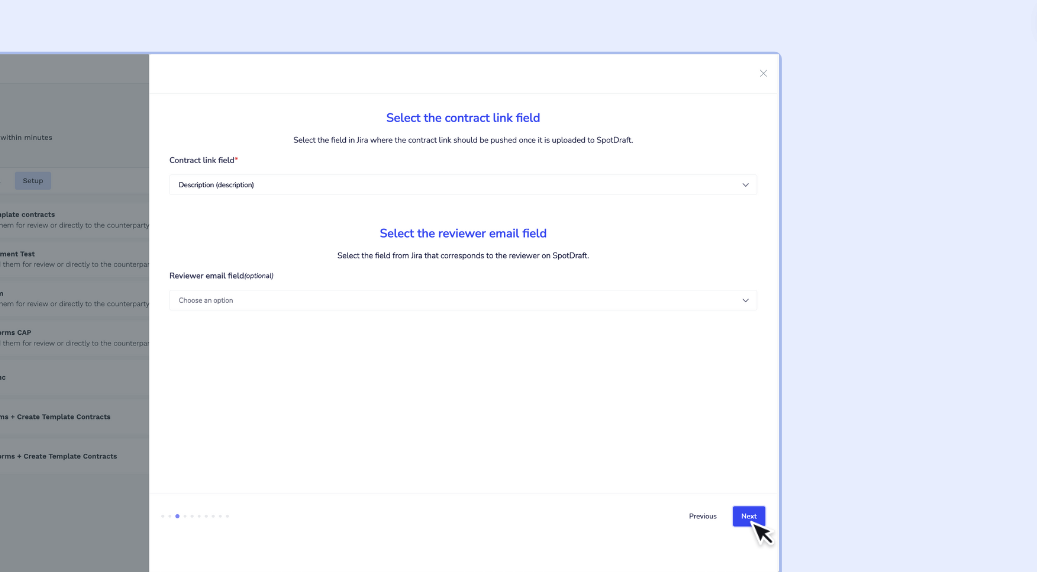
4. Contract link field
4.1 - Select the Jira field that SpotDraft should populate with a link to the SpotDraft Contract
4.2 - If Jira contains a field that determines the SpotDraft Review, enter it.
4.3 - Click Next.
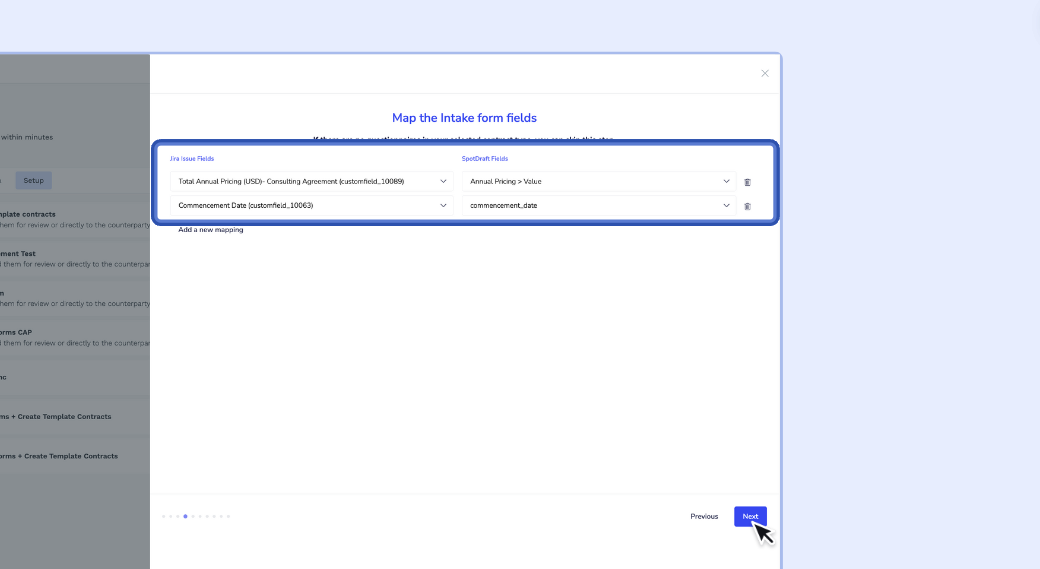
4. Map the Intake form fields
There are 3 pages of the wizard to map the contract data and set units for duration field types and currency for amount fields.
The mapping sheet will detail all of the Contract Type’s questions and have them mapped to Jira fields.
5.1 - With your mapping sheet at hand, locate the fields whose SpotDraft ‘Field Group’ is ‘Contract Template/Type.
5.2 - Click Add a new mapping such that all ‘SpotDraft Fields’ (right column) have a mapping row.
Note. Questions that were given the Type ‘Duration’ or ‘Currency’ will have multiple fields available, only create a mapping row for the ones that have the suffix ‘ > Value’.
5.3 - Select the corresponding Jira field for each mapping row based on the mapping sheet.
5.4 - Click Next.
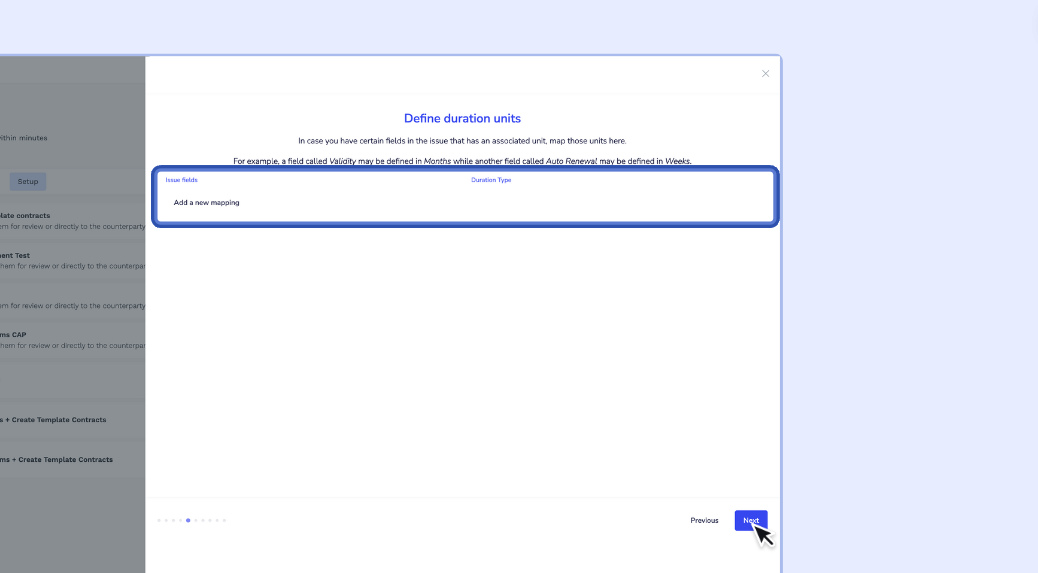
6. Define duration Units
For any questions that have the SpotDraft Data Type set to ‘Duration’ in the mapping sheet, we need to define the duration’s unit e.g. Days, Weeks, etc.
6.1 - Check your mapping sheet for the SpotDraft questions whose Type is ‘Duration’ (these were highlighted when the mapping sheet was created).
6.2 - If there are none, click Next.
6.3 - If there are some, click Add a new mapping such that all ‘Duration’ field types have a mapping row.
6.4 - Set the duration unit for each mapping row.
6.5 - Click Next.
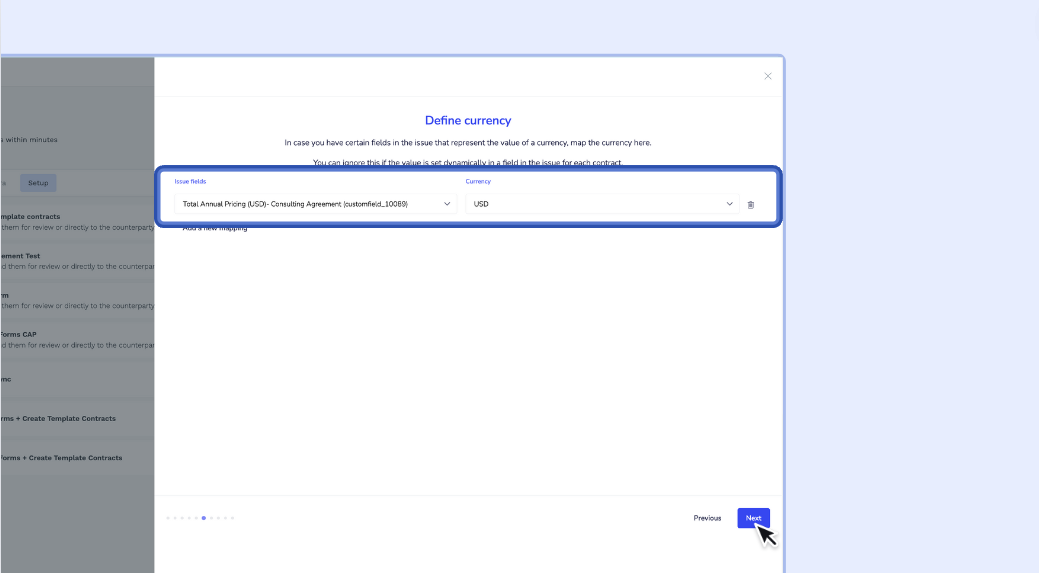
7. Map Currency fields.
For any questions that have the SpotDraft Data Type set to ‘Currency’ in the mapping sheet, we need to define which currency e.g. USD, GBP etc.
7.1 - Check your mapping sheet for the SpotDraft questions whose Type is ‘Currency’ (these were highlighted when the mapping sheet was created).
7.2 - If there are none, click Next.
7.3 - Hit ‘Add a new mapping’ such that all ‘Currency’ field types have a mapping row.
7.4 - Set the ‘Currency’ for each mapping row e.g. Pound Sterling.
7.5 - Click Next.
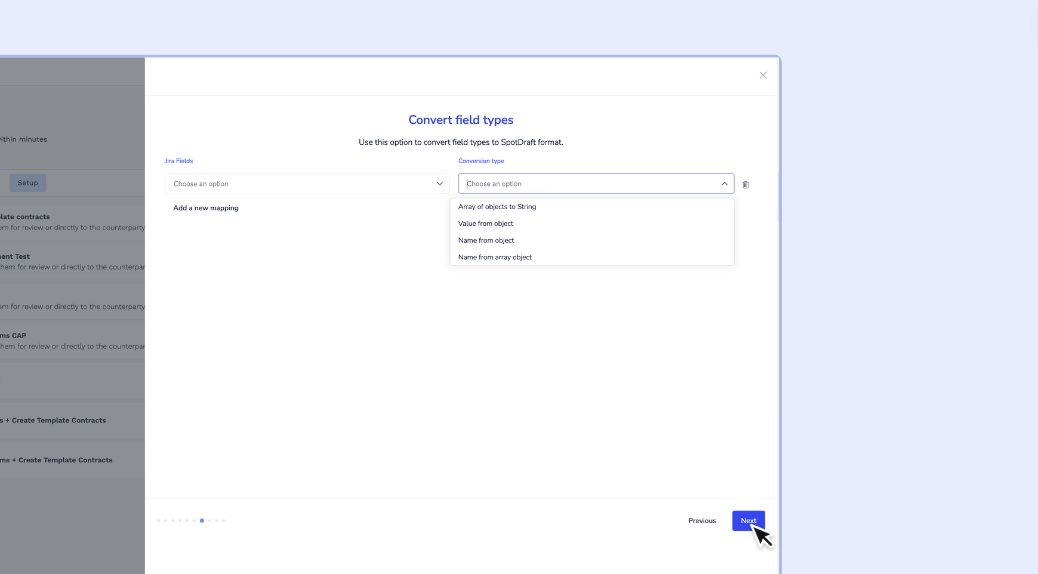
7. Convert field types
7.1 - If any of the mapped JIRA fields are of a dropdown type or the payload is a nested object, select the JIRA field on the left and "Value from Object" on the right.
7.2 - If any of the mapped JIRA fields are of a multi-dropdown type or the payload is an array of nested objects. Select the JIRA field on the left and "Array of Objects to string" on the right
7.3 - Click Next.
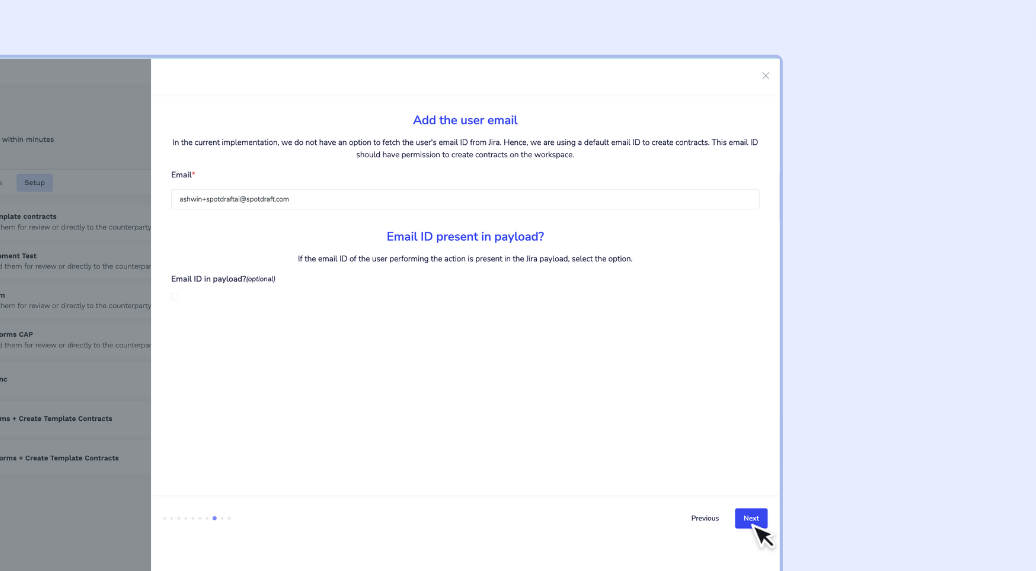
8. Add the user email
8.1 - Enter the email address to be used in SpotDraft as the Creator of the contract.
8.2 - Click Next.
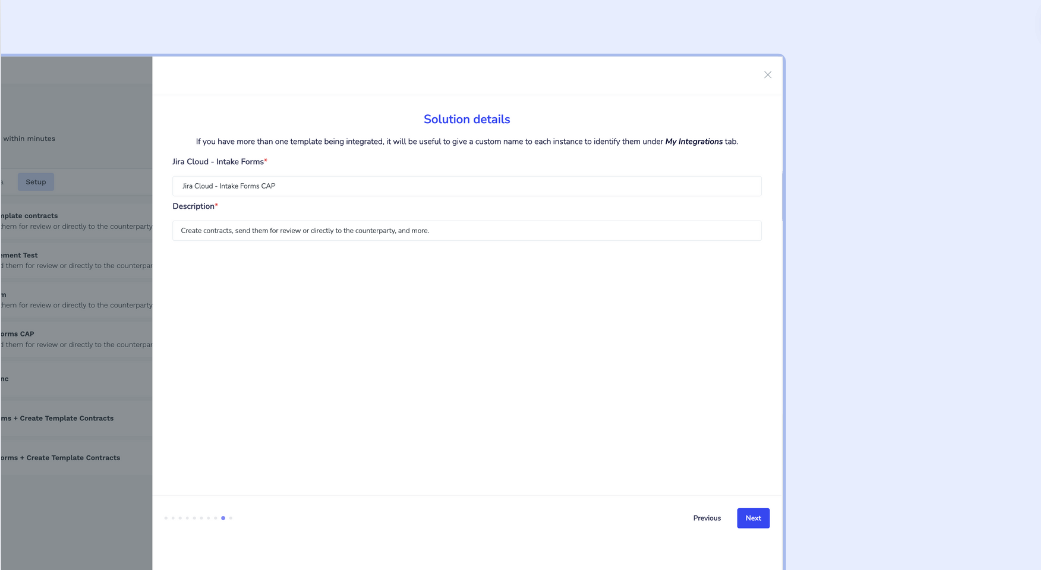
9. Solution details.
9.1 - Enter the ‘Name’ & ‘Description’.
9.2 - Click Next.
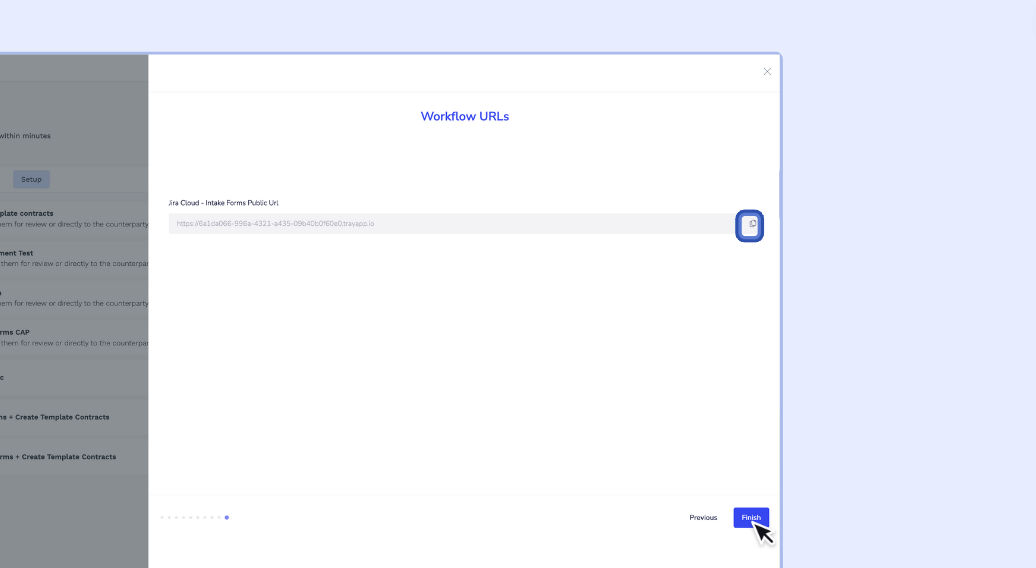
10. Workflow URLs
This last step provides you with the webhook URL needed to set up the automation in Jira.
10.1 - Copy and paste the Contract Intake form webhook URL to a document as you will need it when configuring the automation in Jira.
10.2 - Click Finish.
11. After finalizing the wizard by clicking Finish , you will be directed back to the Integration Setup page. A confirmation message stating 'Installed Successfully' will appear.
11.1 - To complete the process, simply click the Connect button.
Note. It’s now time to add the webhook to Jira.
Jira Configuration for Contract Intake Forms
In this example, when the deal transitions from ‘Negotiation > ‘Create Contract’ the Contract should be created in SpotDraft pulling in all the data from Jira.
The process is the same as the ‘Jira Configuration for Contract Template Workflows’. The only difference is using the ‘Contract Intake form webhook URL’ this time.
1 - Log into Jira and navigate to the board that you wish to Integrate with SpotDraft.
2 - Navigate to Project settings > Automation.
3 - Click Create rule.
4. Create the rule that should trigger when to create the Contract Third Party Paper contract in SpotDraft.
Note. In this example, we want to create the contract when the deal moves from the ‘Negotiation’ stage to the ‘Create Contract’ stage.
4.1 - Enter Manual trigger from issue in ‘Seach triggers’ box.
4.2 - Provide a name to the trigger and Click Next.
4.3 - Select the component THEN Add Action.
4.4 - Enter Send web request into the ‘Seach triggers’ box.
4.5 - Click on the Send web request trigger.
4.6 - Paste the SpotDraft Contract Template webhook URL (saved previously) into the ‘Web request URL’ field.
4.7 - Select Issue data (Jira format) from the ‘Webrequest body’ field.
4.8 - Populate the ‘Rule name’ field e.g. Create SpotDraft Contract’.
4.9 - Click Turn on rule.
Note. Jira will confirm the rule has been ‘enabled’.
🎉 Congratulations. As your deals are managed in Jira, Contract records will be automatically created in SpotDraft!
✅ Verification
Joint Review by Business Users of Jira and SpotDraft as well as the System Administrator: Confirm that the integration functions as expected and delivers the intended value to your operations.
Verifying the integration is a vital step in ensuring that the value promised by the SpotDraft and Jira integration is delivered effectively to the business user. Here's how to conduct this:
Verify the Jira integration for Contract Template workflows
Note. Ensure the user has an account on Jira and SpotDraft with the same email.
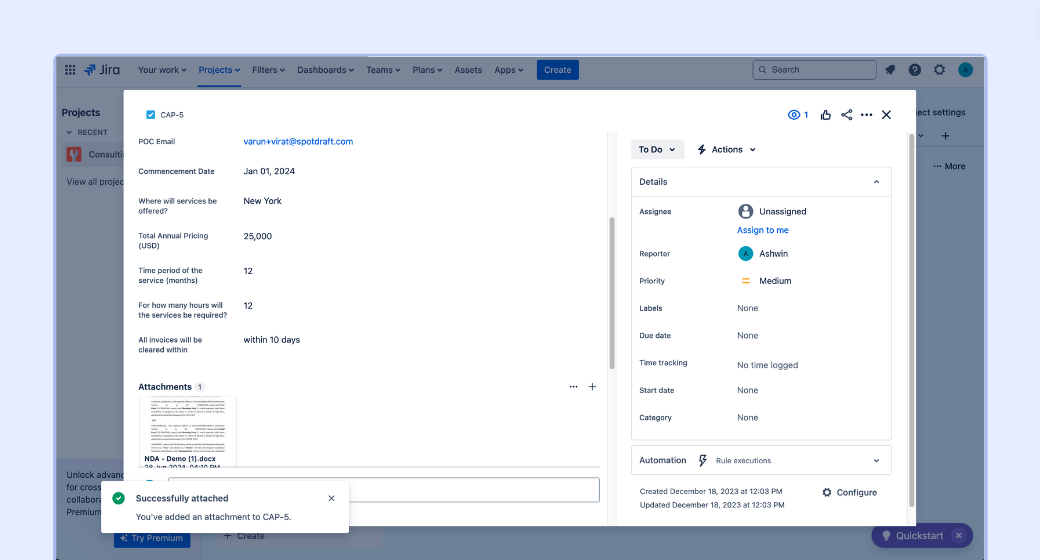
1 - Set up a test deal (issue) in Jira ensuring all the mapped fields are populated.
Note. Refer to your mapping sheet to identify the mapped fields.
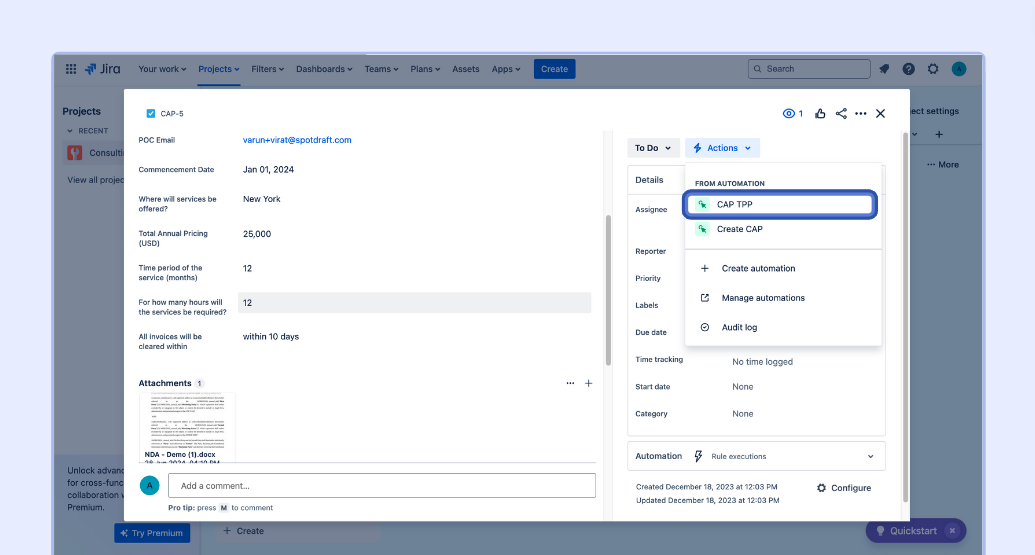
2 - Trigger the rule configured to create the contract
3 - Review the ‘Activity’ section of the deal.
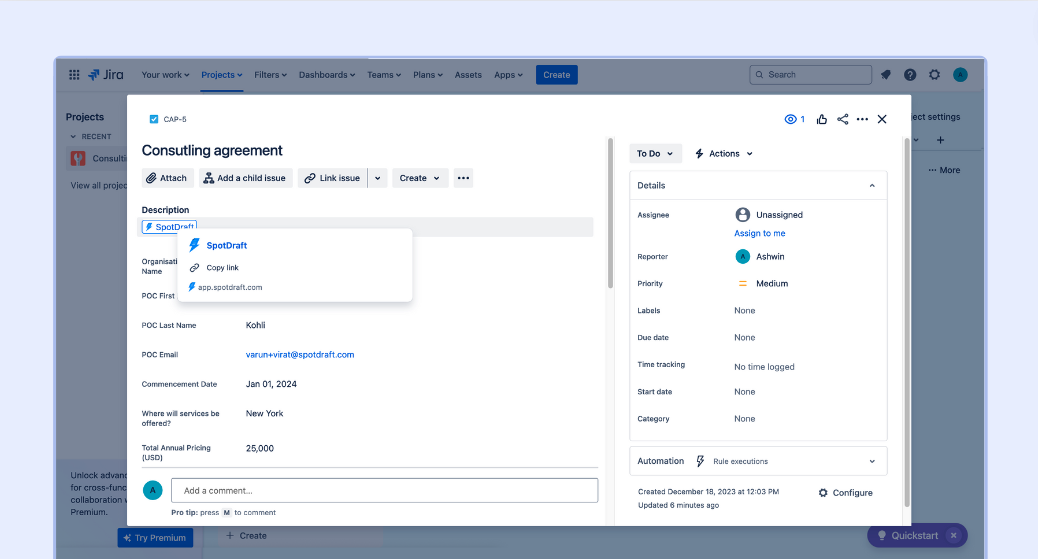
4 - Check for an Activity that provides a link to the SpotDraft Contract.
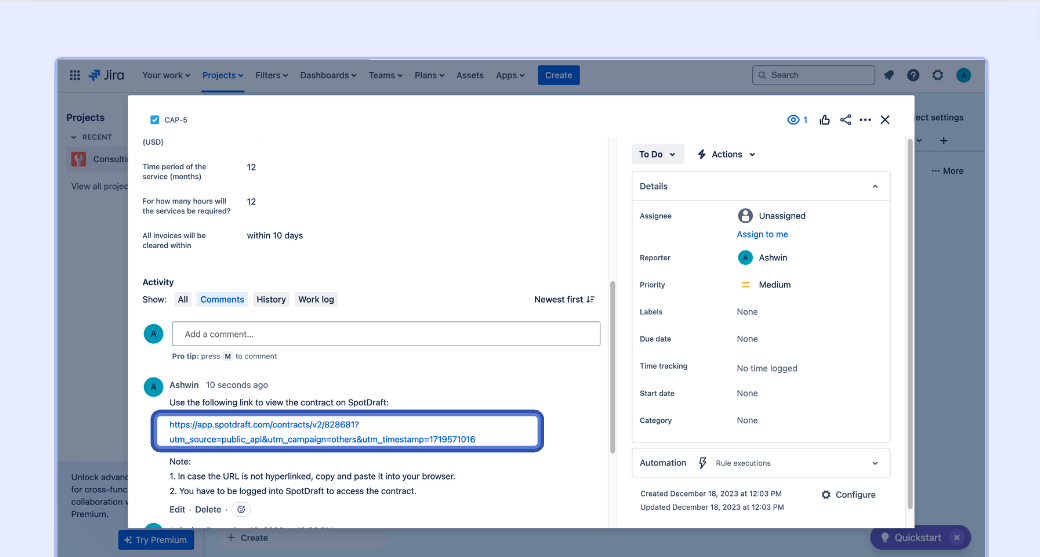
5 - Click the link to the Contract.
6 - Check the mapped fields have all been populated with the expected Jira Data.

🎉 Congratulations. The Integration has been successfully verified. You can now use it to create Contract Templates in SpotDraft based on activity in Jira!
Verify the Jira integration for Contract Intake Forms
Note. Ensure the user has an account on Jira and SpotDraft with the same email.
1 - Set up a test deal (issue) in Jira ensuring all the mapped fields are populated.
2 - Attach the Third-party Contract.
Note. Refer to your mapping sheet to identify the mapped fields.
3 - Trigger the rule configured to create the contract
4 - Review the Jira field that was mapped to the SpotDraft ‘Contract Link’ field.
5 - Click on the link to the SpotDraft contract record.
6 - Check that the mapped field that shows a link to the Uploaded Third party Paper contract
7 - Click View Contract and check that it is the expected Third-party contract.
🎉 Congratulations. The Integration has been successfully verified. You can now use it to create Third-party contracts in SpotDraft based on activity in Jira!
💡 Tip: If you run into any issues and would like some assistance, simply contact your SpotDraft Customer Success Manager (CSM).
💬 FAQs
- Q: How does SpotDraft integrate with Jira?
A: SpotDraft integrates with Jira using webhooks. When a specific event or transition occurs in Jira (like moving a deal to the 'Create Contract' stage), SpotDraft automatically pulls relevant data from Jira to create a contract. This contract is then linked back to the Jira issue for easy access.
- Q: What types of contracts can be created through the Jira integration?
A: The integration supports creating various types of contracts, including Template Contracts, Third-Party Contracts, and Upload & Sign Contracts, depending on the data and triggers set up in Jira.
- Q: Do I need to be a Jira admin to set up this integration?
A: Yes, administrative access in Jira is necessary to set up the integration, as it involves configuring webhooks and custom fields.
- Q: Can I customize which Jira events trigger contract creation in SpotDraft?
A: Absolutely. You can configure the integration to trigger contract creation on specific events or transitions in Jira, such as when a deal reaches a certain stage.
- Q: How are Jira fields mapped to SpotDraft contract fields?
A: You will need to map Jira custom fields to corresponding fields in SpotDraft during the setup. This ensures that the right data from Jira populates the relevant sections of your SpotDraft contracts.
- Q: Is the integration secure?
A: Yes, the SpotDraft-Jira integration is designed with security in mind. Data transfer between Jira and SpotDraft is handled securely to protect your contract information.
- Q: Can I track the status of a contract created via Jira in SpotDraft?
A: Yes, once a contract is created in SpotDraft through Jira, its status can be tracked and managed directly within SpotDraft.
- Q: Will changes made to a contract in SpotDraft reflect back in Jira?
A: The primary function of the integration is to create contracts in SpotDraft based on Jira activities. While contract creation is reflected in Jira, subsequent changes made in SpotDraft are not automatically updated in Jira.
🏁 Conclusion
With the completion of this guide, you are now on the cusp of revolutionizing your contract management process through the SpotDraft-Jira integration. This powerful synergy between project management and contract creation brings a level of automation and efficiency that can significantly transform how your team handles contracts.
By integrating Jira with SpotDraft, you've enabled a dynamic workflow where project updates and transitions in Jira seamlessly initiate contract creation in SpotDraft. This integration not only ensures a streamlined process but also maintains accuracy and consistency, reducing manual effort and the potential for errors
👋 Remember, should you encounter any challenges or require further assistance, our team is always ready to support you. We're committed to ensuring your continued success with this powerful integration.
📚 Additional Resources
- Jira’s Knowledge base
- Engaging Your Customer Success Manager for Maximum Value: Discover how to leverage your CSM's expertise to get the most out of your SpotDraft subscription.
- Integration Guides for Salesforce HubSpot and Zoho: Explore our guides for integrating SpotDraft with Salesforce, HubSpot and Zoho, providing insights into dedicated CRM integrations available.